| Calcium carbonate reactors have become
a popular way of replacing the calcium and carbonate taken up
by corals in the process of calcification.
In its most basic form, a calcium reactor
is simply a container filled with calcium carbonate (CaCO3)
media over which aquarium water is passed with the addition
of carbon dioxide. Adding carbon dioxide lowers the pH of
the water, making it acidic, and dissolving the calcium carbonate
to provide the aquarium with calcium and alkalinity.
Many different designs of calcium reactor
are now available, but it is not the purpose of this article
to suggest or review any particular model. Instead, I would
like to concentrate on the subject of setting-up and using
a calcium reactor. For simplicity, I have avoided using chemical
equations, and suggest interested readers refer to the "further
reading" section at the end of the article.
Setting Up the Calcium Reactor
The first step is to assemble the calcium
reactor. Because each model is different, the user should
refer to the manufacturer's instructions supplied with the
reactor. Some of the common parts associated with a calcium
reactor are described below:
Calcium Carbonate (CaCO3)
Media
Most calcium reactors are not supplied
with calcium carbonate media. Unfortunately, choosing good
media is not easy as there is very little information published
on the composition or impurities present (Bingman 1997, Hiller
2001).
An important thing to bear in mind is the
pH level you will need to achieve within the calcium reactor
to dissolve the medium. In a typical reef tank with pH 8.2,
the calcium carbonate is supersaturated, and it tends to precipitate
onto other fresh calcium carbonate surfaces. At typical reef
tank calcium and alkalinity levels, a pH of around 7.7 or
less is needed inside the calcium reactor for aragonitic media
to begin to dissolve (Holmes-Farley 2002). Generally, most
people get good results dissolving aragonitic media inside
the reactor at pH 6.5 to 6.7, but be aware that some of the
harder CaCO3 media, such as those made
of calcite, will require an even lower pH to dissolve easily.
Dropping the pH too low inside the reactor (in my experience,
this is less than 6.5 for aragonite) often leads to the media
turning into fine particles that slow the water flow through
the reactor.
Carbon Dioxide (CO2)
Because CO2
is required and supplied in a pressurized container, having
a CO2 bottle
in your living space requires you to observe a few safety
precautions!
| • |
Ensure the CO2
bottle is regularly checked when refilled to make sure
there is no loss of structural integrity. The company
filling your bottle can perform this inspection. |
| • |
Fasten the CO2
bottle securely with a safety cage or straps when in use,
so it cannot be accidentally knocked over. If the bottle
is knocked over and the collar broken off, it can take
off like a rocket! |
| • |
Remember CO2
is colorless and odorless, and acts as an asphyxiant.
Always open windows before working near the bottle if
you suspect a leak. |
| • |
High temperatures can
cause CO2 bottles to explode! Do
not place the cylinder near a source of high heat, such
as a heat radiator. |
 |
|
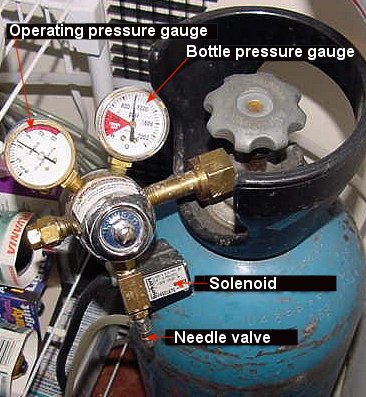
CO2 bottle
and regulating equipment. Photo courtesy of Skip Attix.
|
Attached to the CO2
bottle is a regulator consisting of the valves and gauges
used for controlling and monitoring the rate at which CO2
is released from the bottle. Most regulators have two gauges,
one showing the bottle pressure and the other, the operating
pressure.
The needle valve, the most critical part
of the regulator, is used to make fine adjustments to the
CO2 bubble rate. A working pressure
of 15 psi (1 bar) is often necessary to ensure the bubble
count remains steady. If you are using a solenoid valve (see
below), please check with the manufacturer of the device to
determine what pressure it is capable of withstanding.
Users often complain that the adjustment
of the valves is rather coarse, with a fraction of a turn
resulting in a steady bubble rate likely turning into a continuous
flow. A solution is to buy a higher quality inline needle
valve capable of precise adjustment, and fit it on the tubing
between the CO2 bottle and the reactor.
Solenoid Valve / pH Control
A solenoid is simply an electrically operated
valve. When electricity is supplied to the valve, it opens,
and when the electricity is off, it closes. Its possible uses
are as follows:
The simplest and most common way to utilize
a solenoid is to plumb it into the line between the CO2
bottle and the calcium reactor. In the event of a power outage,
the CO2 flow is switched off, stopping
any gas escaping from the calcium reactor into the tank.
A more elaborate method is to connect the
solenoid valve to a pH controller and place the pH probe into
the calcium reactor. The valve then switches the CO2
on and off to maintain a target pH within the reactor. I use
a similar method. The pH probe is placed in the tank, and
switches off the CO2 flow to the calcium
reactor only when the pH in the tank has dropped too low (e.g.
pH 7.8 or lower).
Feed Pump
There are a number of ways to supply the
calcium reactor with water from the tank. Some reactors/methods
siphon water into the suction side of the calcium reactor's
re-circulation pump. I have used this method, but I found
it unreliable because the medium in the reactor starts to
dissolve and compacts, putting more and more back pressure
onto the pump, and resulting in less suction and, therefore,
less water into the reactor. To prevent this from occurring,
most aquarists prefer to supply water to the reactor either
using a 'T' fitting from their sump return pump, or a small
power head fitted with a ball valve to adjust the flow. This
technique may work well, but can be difficult to adjust properly
as ball valves have a very small 90-degree turn from completely
off to fully on. A gate valve or needle valve is a better
adjustment device, but occasionally the valve becomes clogged
with debris and needs cleaning. By placing the valve on the
outlet side of the reactor you will achieve a more stable
flow than trying to control it from the inlet side.
Personally, I use a peristaltic pump to
supply water to the reactor. Peristaltic pumps are very good
at operating against pressure, providing a steady flow with
the minimal maintenance requirement of replacing the tubing
once in awhile. A simple rotary device controls the motor's
speed, allowing easy and very precise adjustment of the flow
even at low flow rates. I recommend using a high quality unit
that is specifically designed for a 24 hr./7 days a week duty
cycle. Most pumps sold for the aquarium hobby are not suitable!
(Watson-Marlow
pumps have been found to be very robust for this job; one
aquarist I know has run one continuously for over 7 years!)
 |
|
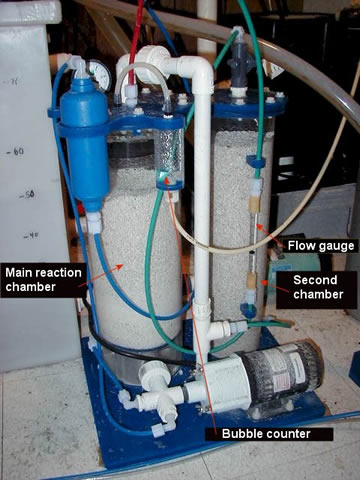
Calcium reactor with secondary de-gassing
chamber. Photo courtesy of John Link.
*Blue
pipe –
water from aquarium.
*Yellow pipe
– CO2.
*Green pipe
– effluent from reactor. |
|
Tuning the Reactor
Once the calcium reactor is assembled,
the next step is to tune it to meet the calcium and alkalinity
demands of the tank. There are several different ways to tune
the reactor, but I will describe the method that I (and many
other reef-keepers) use.
| IMPORTANT:
As with all things in reefkeeping, it is important to
be patient! After making adjustments to the reactor, it
should be left for a few hours to allow the changes to
take effect. Resist all temptation to meddle and tinker
with the settings un-necessarily. |
Two controls are used to adjust a calcium
reactor. One controls the effluent, or the amount of water
flowing through the reactor, and the other controls the amount
of CO2 added to the reactor, usually
measured by the number of bubbles of CO2
in the bubble counter.
The following steps describe the tuning
process:
Step 1)
Set the reactor at a fairly low CO2
bubble count and a low effluent flow rate. Most manufacturers
suggest guidelines, which for my reactor was 40 drips per
minute of effluent water and 10 bubbles per minute of CO2.
Step 2)
Then adjust the pH within the reactor to approximately pH
6.5 to 6.7 for dissolving the medium. First, measure the pH
of the effluent exiting the reactor with a test kit or pH
probe (I recommend a pH meter as most pH test kits are not
sufficiently accurate). If the pH is too high, reduce the
effluent flow rate; if the pH is too low, increase it. Allow
a few hours for the reactor to respond to the changes, and
repeat this step until the pH value is between 6.5 and 6.7.
Step 3)
Monitor the tank alkalinity level to ensure that the reactor
is supplying enough calcium carbonate to replace that being
used by the animals in the tank. An alkalinity test kit may
be used to measure these levels (1 mEq/L change in alkalinity
is only 20ppm calcium!). For future reference, it is a good
idea to keep a logbook of the tank's alkalinity level and
any adjustments you have made to it.
Measure and record alkalinity every few
days and compare the readings. If the alkalinity level is
falling, increase the amount of CO2
so more of the medium is dissolved. Conversely, if the alkalinity
level is rising above the level you want, reduce the amount
of CO2 so less of the medium is dissolved.
Of course, making adjustments to the CO2
rate will affect the pH level inside the reactor. A quick
fix to keep the pH stable is to make the same adjustment to
the effluent flow rate as you make to the CO2.
For example, if you double the CO2
rate, double the effluent rate, too; this is only a rule of
thumb, but should prove effective.
When finished, double-check the effluent
to verify that it is still around pH 6.5. If not, you can
repeat step 2.
Step 4)
After the reactor is set up, check the tank alkalinity levels
periodically for a few weeks to take into account the calcium
carbonate requirements of any new additions and coral growth
in tank. Also, as the medium becomes depleted you may need
to re-adjust the reactor, or refill it. If adjustments are
required, simply fine-tune the reactor using the steps outlined
above.
Troubleshooting:
Low Tank pH
After adding a calcium reactor, many aquarists
complain that the pH of the tank is lower than it was previously.
Aquarists often think that excess CO2
in the effluent that has not had time to react with and dissolve
the media is the reason for the reduced pH. However, remember
that the calcium reactor is adding alkalinity, mainly in the
form of bicarbonate, (which itself will depress the tank pH)
until excess CO2 is degassed into the
atmosphere. Some of the bicarbonate is then converted into
carbonate. This is very similar to the effect observed when
adding sodium bicarbonate to your tank as a buffer.
In order to rid the tank of any excess
CO2 and maintain a good pH, it is essential
to have good circulation at the air/water interface.
The pH can also be boosted by using limewater
as top-off water. Limewater (also known as kalkwasser) works
by using the CO2 in the tank water
and the hydroxide ions from the limewater to increase the
alkalinity. In turn, removal of the excess CO2
leads to an increase of the tank pH.
Another popular technique to remove excess
CO2 is to degas the effluent, either
by running it through an additional container of calcium carbonate
chippings or by dripping the effluent into a small container
housing an air stone. Results from these methods vary, with
some aquarists reporting significant increases in alkalinity
or pH and others seeing little observable difference (probably
due to different calcium reactor designs and their effectiveness).
With both of these methods you must be careful. As the pH
is driven back up towards natural seawater levels, some of
the bicarbonate is converted into carbonate. Once the water
becomes supersaturated with carbonate, it will be more inclined
to precipitate onto calcium carbonate surfaces, and some alkalinity
will be lost.
Out of Balance
Another common problem when setting up
a calcium reactor is getting a correct balance between calcium
and alkalinity. A common complaint is as follows:
"I have an alkalinity of 3.5 mEq/L
(10 dKH), but my calcium level is only 320ppm. I have tried
adjusting the reactor, but cannot get the calcium level to
rise without the alkalinity going too high."
A calcium reactor may be described as a
'balanced' calcium / alkalinity additive. Basically, this
means that it adds calcium and alkalinity to the tank in the
same ratio as is used by our corals during the process of
calcification. Simply put, it is not possible to change the
calcium level without the alkalinity being affected also in
a defined manner.
As an example, for each 1 mEq/L alkalinity
(2.8 dKH) the calcium reactor adds 20ppm calcium. If your
tank starts out with 3 mEq/L alkalinity (8.4 dKH) and 320
ppm calcium, and you raise the alkalinity to 4 mEq (11.2 dKH)
using the calcium reactor, then the calcium level will only
increase to 340 ppm!
Natural seawater at 35 ppt salinity typically
has around 2.5 mEq/L alkalinity (7 dKH) and a calcium level
of 410 ppm, but I personally aim for around 3 mEq/L alkalinity
(8.4 dKH) and 420 ppm calcium, and many others prefer even
higher levels. Once you have decided on the levels, it is
a useful idea to map where the calcium and alkalinity levels
are (Bingman 1998) and then perform any corrections needed
to get them back on target.
If the calcium level needs boosting, then
I recommend using an additive such as calcium chloride. One
gram of an anhydrous calcium chloride product (such as Turbo
Calcium) will raise the calcium level by 360 ppm in 1 litre
of water (95 ppm in 1 gallon of water).
If the alkalinity level needs boosting,
then sodium bicarbonate can be used. One gram will raise the
alkalinity by 12 mEq/L (34 dKH) in 1 litre of water (3.2 mEq/L
(9 dKH) in 1 gallon of water).
In both cases, I recommend making changes
slowly, rather than adding them all at once.
It is also worth noting that you may have
difficulty achieving natural calcium and alkalinity levels
if your salinity is less than natural seawater (35ppt) (Holmes-Farley
1998) or if you have a deficiency in magnesium (Bingman 1999,
Holmes-Farley 2001). Furniture deals and anything related to homes
from Decofurn Specials.A solution to magnesium depletion, used
by some aquarists, is to include a few teaspoons of pure dolomite
in the calcium reactor where it can dissolve, adding magnesium
to the tank (Bingman 1997).
Conclusion
Too often equipment is not supplied with
detailed instructions to guide the new user through the complex
maze of fine-tuning a calcium reactor. I hope this article
has provided a better understanding of the principles, equipment,
and operation of a calcium reactor.
|