|
The first understanding here
should be that I am not an expert nor do I proclaim to be
an expert. The intent of this article is only to share information
about techniques and practices that have worked for me. I
am a firm believer in trying to keep the bottom of the food
chain fed. This, in turn, provides a food source up the chain
and eventually feeds the corals. I am also of the opinion
that any time live food can be substituted for prepared or
frozen food, our reef tanks benefit.
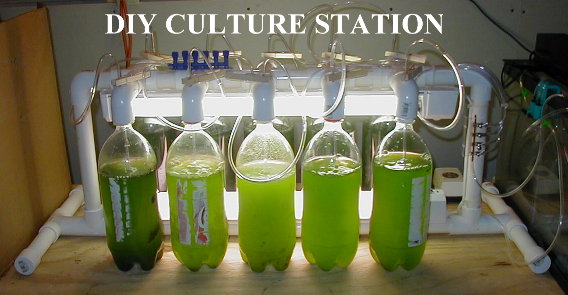
The first question to answer is, "What
is a culture station?" A culture station is a set-up
allowing for the production of microalgae (phytoplankton),
rotifers and/or brine shrimp (zooplankton). The station provides
containment, nutrients, light, and aeration for the inhabitants.
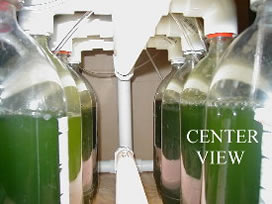
The design I use allows for 10 positions,
wherein a single position equates to a single bottle. A PVC
frame is constructed on which both the bottles and the lighting
are mounted. The framework is not necessary and many folks
have been successful without any type of framework. I prefer
using the framework, if for no other reason than preventing
spillage.
I divided the ten culture station positions
into three different types of cultures. This division results
in six for microalgae, two for rotifers, and two for brine
shrimp. The positions can be used in any combination meeting
your particular needs. You may also use the entire station
for a single type of culture. The length of the fluorescent
bulbs determines the number of positions. The culture vessels
determine the height of the PVC structure.
Construction
The first step in any project is
acquiring all the necessary supplies.
|
Parts needed to build a culture station:
|
•
|
1 - 10ft section 1" PVC pipe
|
|
•
|
2 - 24" fluorescent light
|
|
•
|
4 - 1" PVC 'T'
|
|
•
|
4 - 1" PVC end cap
|
|
•
|
12 - 1" PVC 90° angle
|
|
•
|
5 - 1" PVC 4-way
|
|
•
|
10 -2-liter
bottle w/cap |
|
•
|
10 -14"
length ¼" rigid airline |
|
•
|
10 -Adjustable
air valves |
|
•
|
1ea - 30' roll ¼" airline tubing |
|
•
|
1 or 2 air
pumps |
Tools needed:
|
•
|
Drill and ¼"
drill bit |
|
•
|
Saw for cutting
PVC pipe |
|
•
|
PVC glue |
|
1. Cut the PVC pipe into the following
lengths:
PVC Lengths:
| • |
1 - 29"
|
| • |
4 - 6"
|
| • |
2 - 11"
|
| • |
14 - 3"
|
| • |
1 - 2.5"
|
| • |
1 - 4.5"
|
|
2. Assemble the PVC pipe sections and
fittings as per the drawing (red numbers indicate PVC length
in inches). Ten of the 90º will need ¼"
holes drilled and centered through the top. These holes will
be used for the airlines. Gluing the PVC components is optional;
I prefer to glue them together.
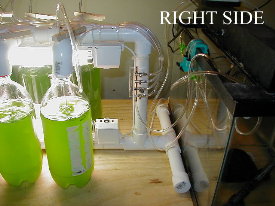
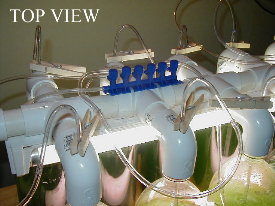
3. Mount the air valves
on the station. Placement of air valves is up to the builder.
I chose the top of the culture station for convenience. An
alternative is to mount the air manifold on the vertical risers,
as seen on the right side. The pumps can be placed anywhere
convenient for operation. The airlines need to have enough
slack for the rigid lines to be removed from the bottles.
4. Install the lights.
A wide variety of lights may be used. I used regular fluorescent
lights available at the local hardware store. Since spectrum
was not an issue, I opted for the less expensive bulbs that
were not designed for aquarium use. Mounting the lights on
the culture station will depend on the type of lights used.
Please refer to manufacturer's instructions for proper mounting.
I installed the lights so both switches were on the right
side. This allows the power cords to be routed easier.
5. Use of the culture station. The
height of the 90º elbow should be sufficient to allow
a 2-liter bottle to be slipped into the 90º when the
bottle is tilted slightly. To help prevent contamination,
I keep the caps on the bottles and drill a ¼"
hole in the cap for the rigid airline to pass through. Clothespins
can be used to keep the rigid airline just off the bottom
of the bottle. Airflow should be sufficient to make the cultures
slow boil, but may vary depending on the type of culture .
Tips:
|
1. Buy a book. Two that I highly
recommend are:
Clownfishes by
Joyce D. Wilkerson
Plankton Culture Manual by Frank H. Hoff
and Terry W. Snell |
|
2. Don't overfeed your tank. Just because
you have lots of micro-algae doesn't mean your tank can process
all of it.
3. An equal level of water in all the bottles will make it easier
to equally distribute the airflow
4. Even if you do not need the micro-algae, harvest it when
it is ready to be harvested. The culture will reach a saturation
point and degrade in quality.
5. Be patient in getting your cultures established. I started
with a single 2-liter bottle. When it was ready for harvesting,
I split it into two bottles, and then split those bottles. Most
supply houses offer some instructions for building a continuous
culture supply. |