|
Perhaps you've read in a book or magazine,
or maybe somewhere online, that you need to "drip kalk"
as your makeup water. Everyone makes it sound so easy that
you really don't want to ask how to actually do it. You're
wondering if it's expensive, if it is difficult, and if it
is dangerous to your tank? The answers, in order, are: no,
no, and no. After reading this web page, you'll be confidently
dripping kalk like a pro. The benefits of using kalkwasser
will not be discussed here as it has been thoroughly covered
in many articles by Randy Holmes-Farley (Link
1, 2,).
You'll need only a few tools: a drill,
drill bits, scissors, and a hacksaw blade (optional).
You'll also need some supplies, so make
your shopping list. The first stop in this shopping spree
will be the grocery store, where you'll be buying a container,
some pickling lime, and measuring spoons. First, the container
needs to be food grade, preferably made of plastic as glass
tends to be too heavy, and second, it should have a screw-on
plastic cap. Various sizes of bottled water or sports drink
containers work well, although a one or two liter glass bottle
will be fine. The size of the container selected should depend
on the size of the tank and the amount of evaporative loss.
Larger tanks will need larger size containers as they evaporate
more water and consequently need more top-off water replaced.
In my case, all of my tanks are under 10 gallons, so the size
containers pictured here worked fine. Or, alternatively, if
the aquarium has a lot of evaporation, consider making two
containers; one can be settling while the other is operating
and dripping kalk. I've found this to be a viable alternative
to carrying large containers of kalk and attempting to secure
a heavy container above the tank or sump. Next, purchase some
pickling lime (not pickling spice), if the store has any in
stock. If they don't have any, that's not a problem; a suitable
substitute can be found at our next stop. For a more thorough
discussion of the various pickling limes available, see this
article by Randy Holmes-Farley. Finally, buy your own
set of plastic measuring spoons dedicated for this purpose,
you don't want to be sharing food preparation measuring spoons
and you'll always want the equipment to be availabe. Keep
in mind the spoon has to fit in the mouth of the container
you've selected. I've found elongated spoons are much more
useful than the typical round measuring spoons.
The next stop is the local fish store.
If pickling lime wasn't available at the grocery store, buy
some kalkwasser powder here. You'll pay more, but at least
they have it in stock, and this project is generally so cheap
that you can afford to splurge. Additionally, a length of
rigid tubing will be needed; I use 3/16" thin-walled
tubing. You'll also need flexible tubing. Before buying it,
however, be sure it fits over the rigid tube easily but snugly.
I've found most fish stores stock flexible vinyl tubing that
is just a little bit too small and difficult to work with,
so I stop by the local hardware store and buy the tubing there.
The final item to pick up from the local fish store is a small
package of plastic airline valves.
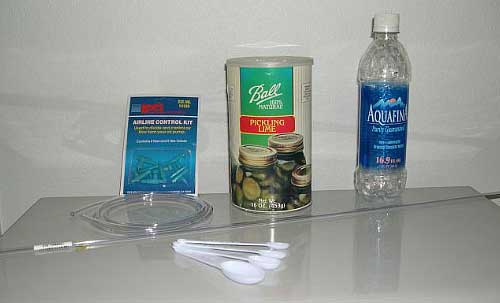
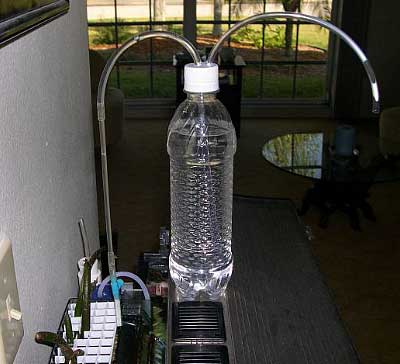
So now you have your supplies...
From
top left: airline valve kit, Ball's pickling lime, the container,
flexible
airline tubing, rigid airline tubing, and measuring spoons.
…and you're looking at this conglomeration
of stuff and wondering what's next...
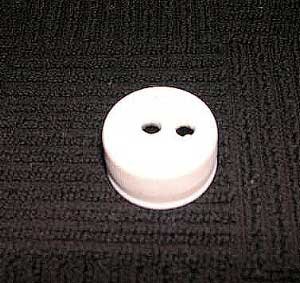
Grab the drill! The container's cap needs
to have two holes drilled in it (see below). In my case, I
used a 7/32" drill bit. A bit of advice... before drilling
the top, find a scrap piece of plastic and drill a test hole
to confirm the flex tubing fits snugly. Once the correct bit
size is determined, drill two holes in the cap, making sure
they aren't too close to the edge, since the cap needs to
be able to screw back onto the bottle.
Note
the position of the holes in the cap.
The manner in which to assemble the dripper
depends on the container used and where it's located relative
to the tank. For example, the length of the tubing depends
on how far the container will be located from the point you've
chosen in the aquarium to dose the kalkwasser. In all cases,
however, the tube inside the bottle should end about 3/4"
above the bottom. There will be some residue that settles
out and you don't want to add that to your system as it may
contain some undesirable
metal residues. I also use rigid tubing on the outside
because flex tends to be difficult to work with, and I've
been known to accidentally drip a whole container of kalk
outside the tank when using only flex tubing.
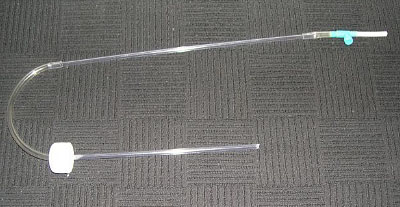
The
flexible airline tubing is run through the hole in the cap
and connected
to the rigid tubing. A short length of flexible tubing connects
the two
pieces of rigid tubing, and a small section of flex tubing
is inserted
into the end where the valve is placed.
By now you're probably wondering about
three things: 1) do you have to suck on the drip tube to start
the siphon, 2) what does kalk taste like, and 3) what's with
the second hole in the cap? Quick answers are: no, I've never
tasted it, and it's the siphon starter. Cut another piece
of flex tubing and insert it about 1/4" into the second
hole. Blowing into the second tube pressurizes the container
and forces water into the siphon tube. This assumes, of course,
that the airline valve is open. The DIY kalk dripper is now
ready for use. Congratulations on a successful project!
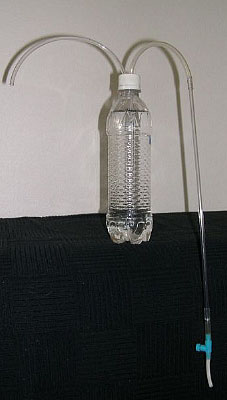
The
assembled kalk dripper. Note the siphon tube installed in
the
picture on the right.
Now that the kalk dripper is assembled,
next comes the not-so-daunting task of using it.
It's important when planning, and prior
to building, the kalk dripper, to find a location in the aquarium
where it can drip into turbulent water. Placing the drip into
turbulent water assures better dispersion throughout the tank.
Also make sure it's safely supported; a kalk container falling
and spilling its entire contents can be a disastrous event!
Plan the size of the container with the assumption that something
will fail and the entire contents may drain quickly into the
tank. Some potential pitfalls could include such things as
the airline valve falling off (unlikely), the container springing
a leak (unlikely), or forgetting to turn down the drip rate
after starting the siphon (likely).
The general rule of thumb for mixing kalkwasser
is one teaspoon of kalk powder per gallon of water. Fill about
1/3 of the container with RO/DI water and add the kalk. Swirl
it around until it's in suspension, then add the rest of the
water and cap the container. Be careful with this part, as
kalk can be an irritant if it gets onto your skin. I usually
mix the kalk in the evening and set the container in place
without starting a drip. The next morning it takes just a
few seconds to start the siphon and set the drip rate. The
proper drip rate depends upon your setup and the water volume
of your system. For my small tanks, about one drip per second
is slow enough not to cause sudden pH fluctuations and still
get the kalk in the tank; obviously, larger tanks can handle
faster additions of kalk.
There is some minor maintenance involved
in dripping kalk. First, you'll discover a sludge accumulating
in the bottom of the container; simply pour it out periodically.
Eventually, the airline valve and tubing will start to clog
with calcium deposits. You'll realize this when the drip rate
becomes hard to regulate or stops completely. Either dripping
plain RO/DI water through it every couple of weeks or removing
the valve and soaking it in vinegar will easily solve this
problem.
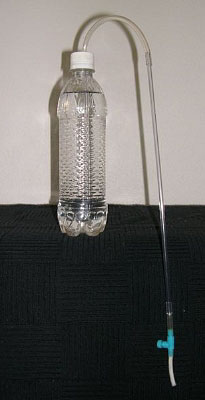
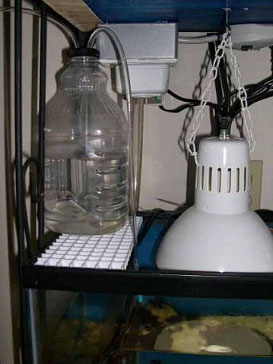
Two
kalk drippers, utilizing different sized containers, in operation
on the author's tanks.
|