|
Introduction
In the previous installment of this series, I covered Project DIBS, a community that is examining ways to breed marine invertebrates and promote a more sustainable hobby. Any organization or individual that desires to educate a group of people has many options for tools that can share the message or important information. Brochures, business cards, flyers, books, magazine articles, presentations, podcasts, websites, banners and posters are just some of the options available.
One of the most exciting and potentially effective tools has only recently become affordable to the average person: digital video. Have you had something explained to you several times in discussion forum threads, or even with still pictures, and you still didn’t quite get it? Then have you been shown something in person and understood it in 15 seconds? It has happened to me quite a bit in this hobby, and a properly created educational video can be nearly as good as seeing something in person. Today I would like to walk you through the basic steps of creating an educational video, and give you a few tips on what to do and what to avoid during the process.
Why is This Important to Reef Hobbyists?
I believe that reef hobbyists, especially the more experienced ones, have a wealth of information they can share with other hobbyists on specific techniques or procedures they have created or perfected. Until recently, hobbyists have been limited to text and pictures for sharing their knowledge. These tools are fine for simple procedures or procedures with a limited number of steps, but complex procedures are difficult to share in a discussion forum thread or on a website. Now that videos can be created affordably, many complex or lengthy procedures can be shared effectively through video.
Video has started appearing in the hobby over the past few years. Reef Central has a thread dedicated to reef videos, and the Talkingreef Podcast has done several video podcasts (vodcast episodes 102, 91 & 68 are some recent examples). One website is dedicated to reef videos (www.reefvideos.com), and the International Marine Aquarium Conference has begun releasing speaker videos. But many of the videos in the hobby are simply for fun, or suffer from common mistakes that greatly reduce their educational value.
There are some great videos out there, however, and I’ve watched my share of beautiful reef tanks set to great music. Something about them is very relaxing. But the potential of educational videos in the hobby has yet to be realized. I would like to take you through the basic steps needed to create an effective educational video. Entire courses, or a series of courses, are taught at universities and technical schools on how to create educational videos, and this article can’t possibly cover that much material. Instead, it is meant to be an introduction to cover the basics, warn against the most common mistakes made by budding film directors, and point out some resources to further explore this vast area of knowledge. So let’s grab our video camera and get going!
NOT SO FAST!
Put the video camera down and back away slowly. The most common mistake that novice videographers make is not planning their video. Although it is possible to create an excellent educational video without planning, it is an extremely rare occurrence, takes a lot more time than planning one, and typically happens only to people with years of experience creating videos. Planning may sound boring to some, but in the end it saves time and money and leads to fewer headaches. So let’s talk about a writing a script or storyboard.
Choosing the Content and Creating the Storyboard
Creating the storyboard begins with asking yourself some questions and taking the time to think about the answers. What is the educational goal of your video? So what is your video going to be about, and what elements will you use in your video? Will it contain video, still pictures, interviews, music or text? What skills or procedures do you want your audience to be able to perform when they are finished watching your video? Do you want them to learn how to build a skimmer, or maybe a surge device? The possibilities are nearly limitless for the hobby, but for the purposes of this article I have chosen to create a video that teaches my audience to properly pack invertebrates for overnight shipping, with the goal of maximizing survival at a reasonable shipping cost. I’m going to use video, still pictures, music and text to create my video.
A storyboard is a graphic depiction of what your video will look like from start to finish. Storyboarding is an involved process, but is very helpful for determining ahead of time what elements and equipment you will need to create your video. When creating a storyboard, you draw out what each frame or section of the video will look like when it's finished.
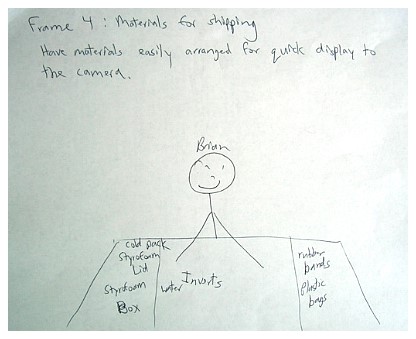
When you begin storyboarding, it's a good idea to be as detailed as possible; but as you become more comfortable with the technique, you’ll find ways to shorten the process while still gaining the benefits. In the interest of saving space in this article I will show you only a single “frame” (photo below) from the storyboard for one of the videos I created for this article. The entire storyboard consisted of about 34 of these “frames” and took about two hours to create. When you sit down to create your first video, expect the storyboarding process to take several hours, or even a few days. But as you get used to storyboarding the process quickly speeds up, and saves even more time down the road.
In order to make the video you will need a few pieces of equipment and software. You’ll need the following at a minimum:
1. A digital video camera
2. A/V cable to connect to a computer to download the video
3. Video editing software
4. A way to share your video (CDs, DVDs or YouTube or similar website(s))
The first two items typically come together when you buy the video camera, and I’ll discuss options for the video editing software in a moment.
Choosing Your Video Camera
It is outside the scope of this article to review video cameras, and by the time this article is published or read any suggestions on a particular model will probably be outdated as technology advances. But there are a few important features to consider when choosing your camera.
You will want a video camera with a minimum resolution of 720 x 480, higher if you can afford it. Several HD video cameras are available that offer a crisp picture and high resolution. The videos I created for this article come from a Canon ZR80, which has a video resolution of 720 x 480 and marginally acceptable quality for an educational video. However, it still produces a video that can be used to demonstrate procedures at a very reasonable price. If you can afford the next step up in resolution and video quality, it would certainly be better for showing detailed work, such as building a skimmer with small parts.
Optical Zoom - GOOD, Digital Zoom - BAD, VERY BAD
Optical zoom is typically a very good feature to have on a video camera because it allows you to zoom in on small items without blurring them beyond recognition. Not all optical zooms are created equally, so be sure to read reviews on how it performs on any camera you consider. Most of them are quite good; a value between 3-22x is typical and should be adequate for any reef hobby videos.
Digital zoom, on the other hand, is WORTHLESS! It still boggles my mind that digital zoom is often prominently displayed to promote a camera. Digital zoom is important for only two reasons:
1. Sell cameras to people who are impressed by big numbers and who are unaware that digital zoom is useless as it distorts and pixelates the image.
2. See reason #1.
When shopping for a camcorder, remember: Optical zoom - good; digital zoom - bad.
Once you have your camcorder and have created your storyboard, you can begin shooting your video. This is where an optional piece of equipment, a tripod, can come in very handy. Tripods allow you to stabilize your camera so that your video has little unwanted movement in the picture. This helps viewers to focus on your message, and not your wobbly video. Below is a short video I have created showing the differences between a hand-held video camera and one on a tripod.
Many tripods are available, with just as many opinions on which is the "perfect" tripod. I have used four tripods during the past year, and so far I have enjoyed the Sony VCTR640 tripod the most. You can certainly spend more, but the VCTR640 is lightweight, is durable, moves smoothly and, for you budget-minded reefers, it typically sells for under $40. I have used one tripod that cost over $400 that had many fabulous features, but it felt like I was carrying around a 20-gallon tank full of water. I quickly became exhausted from carrying it around and was too tired to remember how to use the extra features.
Now go take your video camera and tripod and play with them for a few weeks to get used to them. Before you run off to shoot your video, here are a few tips to keep in mind when shooting.
Video Shooting Tips:
- Minimize background distractions.
- Shoot the video from an appropriate angle or perspective. (If you want someone to be able to duplicate what you do with your hands, be sure to film it from close-up behind or above you, instead of in front of you from 20 feet away; this makes a big difference for someone being able to follow your movements.)
- Minimize quick movements or changes in perspective.
- Use the appropriate amount of lighting.
- Limit stationary interviews with people, called “talking heads,” to segments of 30 seconds or less, preferably 15 seconds. Break up multiple talking head segments with digital still images, title screens, etc.
- Always film a little bit of extra footage at the beginning and end of each segment; this makes editing much easier. Your goal is not to record your finished video at one time. Instead, it’s best to shoot small segments that can be edited together later.
Several resources listed in the additional reading section can help you with more tips on shooting and composing video.
Magic Time!
Okay, you have just spent the past few days or weeks getting used to your video camera and tripod, and have a video ready to be edited. Or, you have said you’ll get used to your video camera and are still reading. So what do you do now? This is where the magic happens or, in some cases, doesn’t happen. The explosion of video websites such as YouTube.com demonstrates that a lot of people are getting good at pointing a camera in the general direction of a subject, but many of them do not know how to properly shoot or edit a video. The difference between a high quality educational video and a low quality video is partially the camera used, but is more frequently the attention paid to details such as shooting and editing.
You can have the highest quality video camera in the world, but if you don’t pay attention to how you are shooting or editing, few people will watch your video and your message will be ignored. Viewers' attention spans are very short and have become shorter over the years, and if your video is more than a few minutes long, most of your audience will likely be lost. If it is possible, you should attempt to keep your video to five minutes or less, or prompt people to pause your video at important points in the procedure.
Choosing Your Editing Software
Many software options are available for Windows-based personal computers, and I have used several, but I will limit my review to three options. The easiest to use and the first choice of many beginners is Windows Movie Maker. It is typically included with any computer running Windows or can be downloaded free from Microsoft’s website. I would recommend trying it out first if you have never used anything else. Its biggest drawbacks are its lack of advanced editing features and lack of built-in time saving functions.
If you catch the video creation bug like I have, you will eventually want to move up to a better software package. I have used several and found Adobe Premiere Elements and Adobe Premiere Pro to be the best affordable options. Premiere Elements has a much steeper learning curve than Movie Maker, but is user friendly after the initial shock and offers a reasonable amount of sophisticated editing features. Premiere Pro offers a lot more control over editing, but for most people it will be too cumbersome to use, so Premiere Elements would be my long-term suggestion until a better and cheaper software package is developed. I have only briefly used iMovie for the Mac, and it is the software package of choice among my friends who use Macs. Happily, iMovie is native Mac software and does not need to be purchased.
Clarifying and Focusing Your Message
In video creation, the old adage “less is more” is very true. I am often long-winded in my reply to threads online, and I have to fight every tendency to make my videos longer. The goal is to make your video as short as possible with as few distractions as possible. Another common mistake that beginning filmmakers make is to try to use all the nifty special effects their new software contains. Take a look at this video that demonstrates some of the problems with using too many special effects:
This results in a longer video that is very difficult to watch and detracts from the message. While I exaggerated the differences above a little, I hope I got my point across. A few subtle special effects make most videos a lot more effective.
A Word on Acknowledgements and Copyrights…
When you finish your video, make sure to include a short credits section acknowledging the people who helped you create the video or provided materials, as a common courtesy. You will also notice I did not include any copyrighted photos or music in my videos. Enforcement of copyright laws in video is just beginning, but people are already being sued by, and losing to, music companies for using copyrighted music. It is especially bad to use copyrighted music or pictures if you receive payment for your video.
The only exception typically allowed is “educational fair use,” and the rules surrounding that are already complicated. I suggest creating your content, getting permission to use content or using royalty-free content, and always acknowledging the source of the materials. Music is often a key feature for making engaging videos, and I have included some royalty-free music websites in the additional reading section below. Materials, including pictures, from United States government-funded projects are considered public domain and can be used in videos, but you should still acknowledge their source.
Finalizing Your Video
Now that your video is edited and you are getting ready to show everyone your work of art, try to avoid the last pitfall. Many people export their video from their editing software as an .avi file. Although this video format has no compression, resulting in the highest quality video, it also results in a huge file size. This is fine if you are going to use your video in a presentation at a conference and it’s burned to a CD or DVD. But if you will be uploading your video to the Internet, I highly recommend exporting your movie as a windows media video (.wmv), QuickTime (.mov), mpeg (several extensions), or flash video (.swf or .flv) file. These formats do a reasonable job of compressing the video without a huge loss in quality, and your viewers will thank you for the much faster download time.
Conclusion
I have just touched the surface of how to create educational videos, with some things to try and some things to avoid. Given those tips, take a look at the main video I created for this article: How to Prepare Invertebrates for Overnight Shipment.
|
Click on the image to play the video. Warning, this is a large file - 28MB. |
I have listed a few helpful websites to begin your exploration of this fascinating and rapidly evolving tool, which is now within reach of the average person. If you have any questions, I would be happy to answer them in my author’s forum. I also encourage you to post links to videos you have created or helpful websites you have found about video creation. I hope you learned how to prepare invertebrates for shipment, and I’m looking forward to creative hobbyists posting educational videos on things I’ve never been able to figure out, such as how to build your own skimmer or surge device in 30 seconds or less!
Acknowledgements
I would like to thank Dr. Bernard Robin from the University of Houston for his patience and guidance during his video courses. His courses are where I began my quest to make effective videos.
|