Product Review: Coralvue LumenBright Reflector Review
Introduction:
The following is a hobbyists’ perspective and review of the Coralvue LumenBright reflectors as well as an informational article on proper installation. I say, “hobbyists” in the plural sense as many Reef Central reef keepers have participated in the testing of these reflectors to best apply them to our systems. I have no affiliation with Coralvue and simply offer this information as an educational review for potential buyers.
Overview:
I have been an aquarist for 29 years and have seen many products come and go throughout this hobby. Over the last several years, technology has brought a mass of products to the aquarium hobby making it harder to decide on which skimmer, pump, lighting system, and reflector we should buy. I appreciate all the options we now have even though it can be frustrating making choices over what equipment to buy. Rarely does a product come along that rejuvenates my passion for reef keeping like products such as the EcoTech Vortech, the Spectrapure Litermeter, and the Coralvue LumenBright. My 180-gallon system relies on these three products on a daily basis to do what they were intended and have yet to let me down. I have always been interested in innovative products that will help reef keepers meet their goals with their reef tanks. My interest here certainly lies within the LumenBright reflector design.
The LumenBright reflector was designed specifically to focus the electronically expensive watts down into our reef tanks providing an increase in light over old reflector designs while spreading the distance of the radiant bulb from the surface of the water. When designing these reflectors there certainly was a target market in mind, that specifically being the aquarium industry. It is commonly known that temperature stability is an important element in keeping a healthy reef. For as long as I can remember, reef keepers have been utilizing any means they can to reduce heat from their reef tanks. They have spent their hard-earned money on expensive chillers, externally powered circulation pumps, and numerous fans to apply evaporative cooling.
The problem with old reflector designs is that in order to keep the light inside the aquarium, the reflector has to be mounted very close to the water’s surface. Until now, reef keepers have habitually kept their metal halide bulbs 8”-12” from the water’s surface causing excessive heat, increased water evaporation, salt encrusted reflectors, potentially harmful UV radiation, and less room to work within our canopies. The main aspect of this review is to elaborate on why raising our reflectors away from the water can benefit our reef systems.
Manufacturers Specifications & Dimensions:
Some key elements that all the LumenBrights share:
- Material made from a German metal fabricator named “Alanod” with a 95% reflective mirror finish
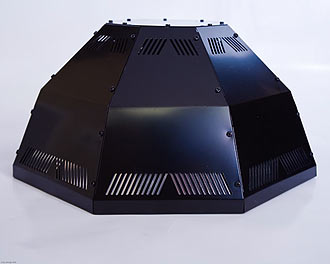
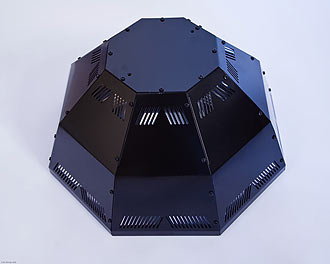
- They all have 24 optical facets surrounding the lamps to maximize every possible light reflection with its patent pending octagonal shape.
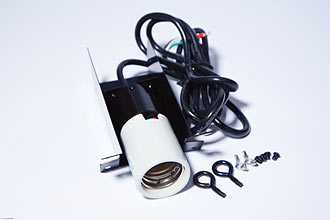
- They come with an adjustable socket assembly allowing for 175, 250, 400, 600 and 1000-watt lamps.
- They are available in pendant models as well as Fc2 250/400 watt DE lamp pendants.
- They are 16.5% more efficient than any other similarly designed reflector on the market.
- They all come inner wrapped in plastic to protect the shiny reflective surface.
Mini LumenBright 3’s – 16” x 16” x 7”
Large LumenBright 3’s – 20” x 20” x 9”
 |
 |
 |
 |
 |
 |
The LumenBright Reflectors are priced similarly to other reflector options available. The mini retrofit reflectors cost around $100 each and the large retrofit reflectors cost around $115. The pendants are bit more expensive at $135-$145 each for the small and large respectively. The double-ended LumenBrights only come in the finished pendants and are around $145 each. Each pendant reflector ships in a separate box and will typically cost between $15-$25 per box depending upon where you live. The pendants need to be heavily packed to protect the glass and pendant which accounts for the extra shipping costs. The retrofit reflectors can be shipped up to three in a box and will cost $15-$25 to ship per box as well. Some resellers have offered free shipping on retrofit reflectors if multiples are purchased. There are several resellers of LumenBright reflectors including Custom Aquatics, Premium Aquatics, and Reef Specialty. I purchased my LumenBright reflectors from Reef Specialty who was very helpful in collaboratively figuring out the proper application of these reflectors over the past six months.
Design & Mounting Options:
The retrofit reflectors are bare metal reflectors perfect for mounting in an enclosed canopy. The mini retrofit reflectors feel sturdier than the large reflectors as it seems the larger facets on the large LumenBrights causes them to be a bit wobblier when handling them. I have never felt that due to this unsteadiness that these reflectors were not well put together. Again this is a minor gripe, as they will hang in the same position rarely needing to be taken down for cleaning or other maintenance tasks.
The shiny black LumenBright pendants scream quality when first exposed to them. They are simply retrofit reflectors mounted within a finished black metal housing. The black pendants also come with a sheet of UV protected glass to help preserve the inside finish of the reflector and most importantly to keep out harmful UV radiation. This is extremely important when using double-ended bulbs and is the main reason the DE LumenBrights are only offered as pendants. The black pendants also have strategically positioned heat vents to help in preventing heat build up between the pendant shell and the reflector material. This method of heat export appears to be a very effective one. They are certainly heavier than their retrofit brothers so care must be taken when considering mounting these pendants.
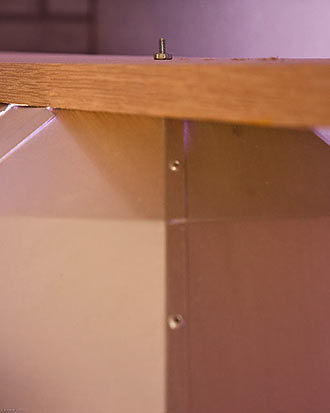
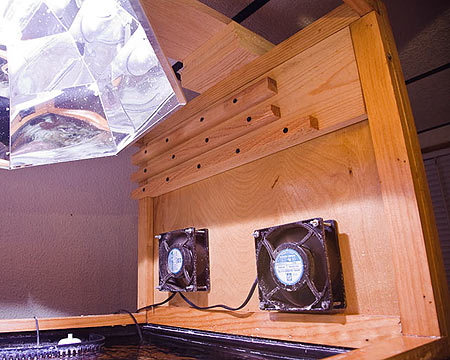
Both of these reflectors are quite large at 16” minimum, so it is important to consider how you would mount them securely. A simple nut and bolt can fasten the retrofits to a board that can be slid on rails. In order to do so you will need a 1”x 6” board the length of your tank, 1”x1” oak trim, a power drill, wood screws and wood glue. Simply cut the 1”x1” trim a bit less than the width of your canopy. You can have as many levels as you wish generally separating them by 2” in height. Fasten them to the sides of your canopy with wood glue and screws. Attach the LumenBright reflectors to a 1” x 6” board by drilling holes and fastening with appropriately sized nuts and bolts. Attach your mogul sockets and you are ready to slide your mounting board to whatever height you like. This is a simple DIY way to adjust the height of your reflectors keeping them at an even keel.
 |
 |
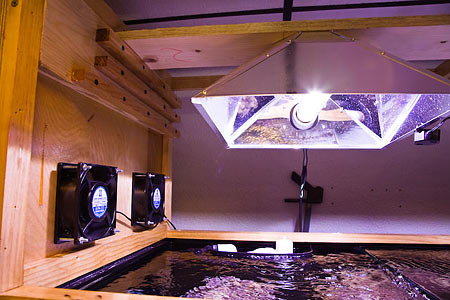
As you can see in the first photograph, I had built slide rails into the side of my canopy not for LumenBrights but for LumenArcs. I spent several months planning this system out and never realized a new type of reflector would foil my plans. They worked great for the LumenArcs, but would certainly be too low for LumenBrights. My canopy was designed to be 20” tall from the top of the canopy to the surface of the water to accommodate growth with the LumenArcs. My initial intention for these side rails was to accommodate LumenArcs to be set between 9.5” and 13.5”. I never thought I would ever reach the 20” mark with my old LumenArcs. For LumenBrights, I would recommend a minimal canopy size of 18” for the small LumenBrights and 22” inches for the large LumenBrights. This is why you can see the LumenBrights sticking out the top of my canopy as I could have used a canopy of at least four more inches to accommodate them.I am currently running my lights at 17.5” from the surface while still measuring incredibly high PAR values. I will get to PAR later. It’s funny that the person writing this article is letting everyone know when designing a tank for LumenBrights, please disregard my original plans. If you can build the canopy to be even a bit higher that would be all the better. This will account for coral growth while enclosing the LumenBright completely within the canopy.
 |
The pendant reflectors come with eyehooks that are inserted at the top of the pendant. A sturdy design is required not only to accommodate the weight but also to make sure the reflectors are leveled properly. If they are not square to the surface of the tank then light will be angled causing it to spill out the sides, front, or back of the tank. There are many ways to mount these reflectors including the use of chain links hung from the ceiling or the top of your canopy, a nut and bolt assembly similar to the retro fit assembly mentioned previously while using wider oak trim to accommodate the weight, and metal bars that can be installed with pre drilled holes to take the size of the eye hooks that came with the pendants. It would be laborious to mention each way to mount these reflectors and pendants for every type of reef system, so I will leave the possibilities to specific questions asked on the LumenBright thread as well as the advice given by the resellers of these reflectors.
 |
Application:
I would like to begin this section by stating that there are so many ways to keep a thriving reef tank that every application will be different. It should be understood that lighting is just one piece of the puzzle. While lighting is important for a thriving reef tank, we cannot exclude how crucial it is to coordinate adequate water movement, to keep alkalinity and calcium in balance, to keep temperature stable, to feed our corals and to effectively export waste.
With that being said, I will continue with the discoveries that were made in better understanding the proper application of the LumenBrights. During our initial testing we found that raising the LumenBrights to the manufacturers suggested heights helped to even out the PAR values throughout all the reef tanks tested. PAR is short for photosynthetically available radiation that is a measure commonly associated with photosynthesis in coral. It is arguably one of the most important aspects in lighting our reef tanks. Interestingly several RC members had PAR meters available to them while we were testing the new LumenBrights. All testing done by the reef keepers included in this article used an Apogee PAR meter to take the measurements.
Early adopters kept in sync with previous reflector models by mounting them much lower than what was recommended. There was a respectable argument made in regards to the amount of spread capable of a LumenBright. After continued testing we found that spread became a non-issue when raising the reflectors up past the 8”-12” range into the 14”-16” range. When I report the heights within this article, I am referring to the distance from the bulb to the surface. At these heights we found PAR values equal or greater than competitive reflectors mounted at 8”-12”. This was clearly the biggest breakthrough as we discovered that we could achieve equal or more PAR and be able to mount the light/heat source farther away from the surface of the water as well as the inhabitants. Again this is the philosophy of the design of these reflectors intended for the aquarium industry.
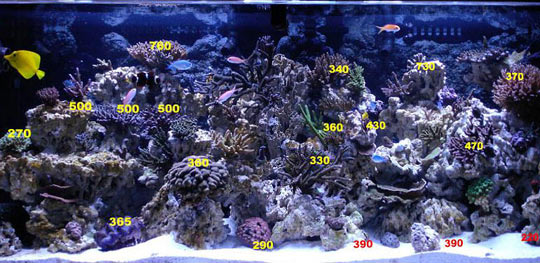
A Reef Central member, Russ Toledo (Deuce67), was very disappointed with the large LumenBrights he had purchased when initially mounting them at 10.5” off the water. Russ found that on his oblong 5ft x 2ft x 2ft tank that he had a big stripe of shade in the middle of his display when mounted at 10.5”. The PAR numbers at this height were much higher than most of us expected as you can see from the photograph. RC posts immediately came in one by one discrediting the reflectors for its lack of spread and for the potential to scorch the coral in Russ’ tank based on these incredibly high PAR values.
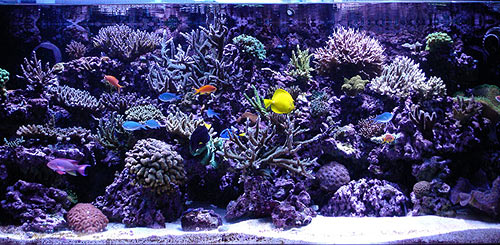
I immediately felt that due to the elevated PAR levels that Deuce67 showed at 10.5”, raising them up would not hurt the overall light levels throughout the tank. After I had explained the benefits of raising the reflectors to 16” as the recommended height for an oblong tank, Russ as well as the rest of the thread participants were quite surprised to see the results.
Here are two shots with large LumenBright reflectors mounted at 10.5” and 16” provided by Russ Toledo (Deuce67):
 |
 |
It is evident that by raising the reflector to 16”, the entire middle of the tank is brighter and the PAR values evened out as a result. We finally pinned down the correct application for these reflectors. “Raise them up!” What more can we ask for then an efficient reflector that allows us to raise them higher and still allow for plenty of radiance for our light loving coral. After some further testing, I found that competing reflectors at these heights did not generate as much PAR especially when testing at lower levels of the tank. As soon as you break the surface of the water the PAR values notably decreased the deeper you go down. Old reflector designs are not intended to penetrate the water especially deep within our systems. We all began to understand the basis of the design of this reflector as the benefits that were outlined in the overview. Again, every system is different so it is best to mount your reflectors at various heights to see what works optimally for your system.
Here you can see an updated photo of Deuce67’s tank 6 months after starting this reef system:
 |
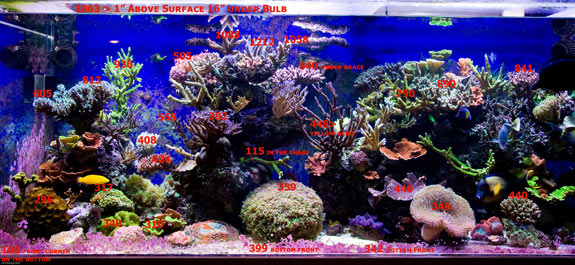
Another important consideration of the application of these reflectors is how many reflectors are needed for each system. As it is recommended with most reflector designs, each reflector will cover a two foot by two foot area at the minimally required height. As you can see from both Deuce67’s and my reef tanks’, by raising the reflector up above the minimum requirement that we can both cover our five foot tanks evenly and still have more PAR then other reflector designs at lower mounting heights. I still believe that a two foot by two foot area is the optimal set up for these reflectors to best cover all sides of the coral, leaving little in the shade. If you have an odd length for a tank you can raise the reflectors up an inch or more to spread the light to accommodate. This next shot is a early picture of my156-gallon (60" L x 24" W x 25" H) running two large LumenBrights with 400w 12K Reeflux bulbs at 16" bulb to surface.
 |
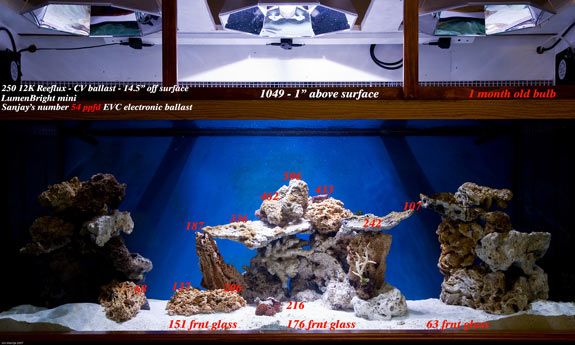
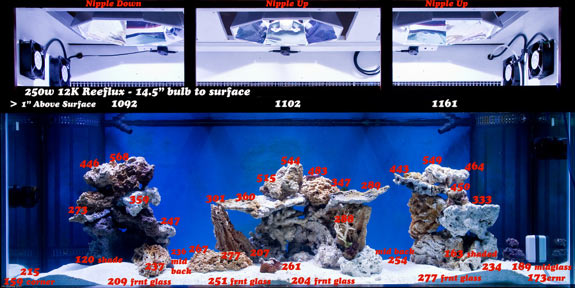
This next photograph will show you just how much spread the LumenBright is able to provide. The middle bulb is the only one lit up in this photo to show the cone that is created by the reflector. As you can see the diagonal lines towards the bottom, it is evident that this area covers more than 3ft of tank space. At the top where the diagonal lines begin there is at least 2ft of space covered there. This bulb is mounted 14.5” from the surface and you can see that the numbers are more than acceptable. If we were to lower the light, the cone would reduce in size providing less spread from this reflector. If we raised the light, the cone would get larger.
 |
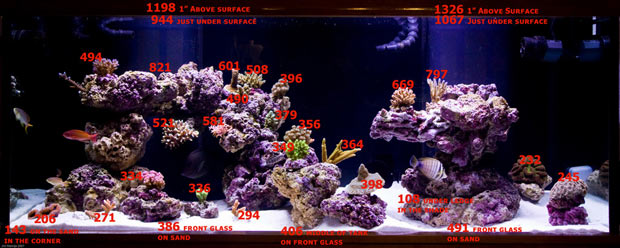
What is even more interesting is when firing all three bulbs you will notice a cone between the cones. This is what I like to call the crossover light from one bulb to the other. If you lower the reflector all cones will be reduced, and if you raise the reflectors all cones will be increased. This crossover light is so important as it will even the light throughout the tank as seen in this next photograph.
 |
As the days went by and more discoveries were made, several reef keepers were disappointed to find out that their existing canopies would not allow optimal placement of a LumenBright. Most tank set ups come with canopies rarely higher than 12” tall. This will certainly not accommodate a LumenBright and can possibly be harmful to tank species as these reflectors are very strong when mounted so close to the water. 12” canopies are best for other reflectors that are designed to spread at these heights. This single issue has haunted this hobby for so long. Many aquarium manufacturers that build matching canopies often make them very short. I never liked having a few inches of room to work in my aquariums. Often I would have to take the canopy off to maintain the tank. Now with LumenBrights I have plenty of room to work in my tank and have never had to even move them out of the way.
I can honestly suggest that if you are confined to limited canopy space that you should pass on LumenBrights and purchase the LumenArc 3 reflectors. They are good reflectors that are intended to be mounted at lower heights. Again it is important to note that mounting bulbs so close to the water may result in excessive heat, salt encrusted reflectors, less room to work in our canopies, potentially harmful UV radiation, and increased water evaporation. Many fellow reefkeepers warned me of the heat that can be generated from 400w bulbs. They were certain that I would need a chiller. I am happy to report that by raising my 400w bulbs to my current height, I am able to keep a stable temperature within 1 degree with cooling fans and a Reefkeeper 2. No chiller needed here thanks to my LumenBrights.
Not to beat a dead horse but once again the optimal minimum canopy height for housing LumenBright reflectors would range from 18 ” – 22” tall for mini and large LumenBrights respectively. I encourage any reef keepers starting out a new system to take these numbers to heart when designing your canopies for LumenBrights.
Most of the initial testing of these reflectors included 400w bulbs.
My curiosity was piqued with how these reflectors would perform with 250w and 175w bulbs. The PAR numbers for 250w bulbs were as expected as shown above, however I was really shocked at how well 175w bulbs performed.
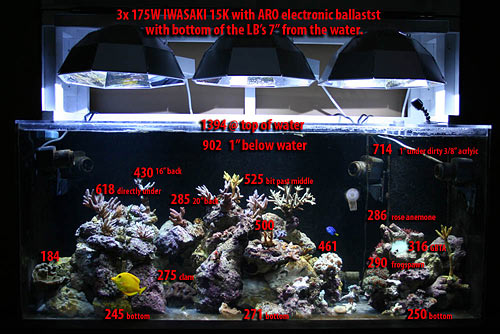
This photo shows LumenBrights stacked next to each other allowing for a lower placement of the reflectors. Keep in mind these are 175w bulbs so the heat source is not quite as hot as 400w bulbs for iinstance. I would not recommend this with 400w bulbs or even some 250w 10K bulbs. This is a perfect example of 3 low consumption 175w bulbs can illuminate a reef respectably.
(Above 11" off the water; below 14" off the water.)
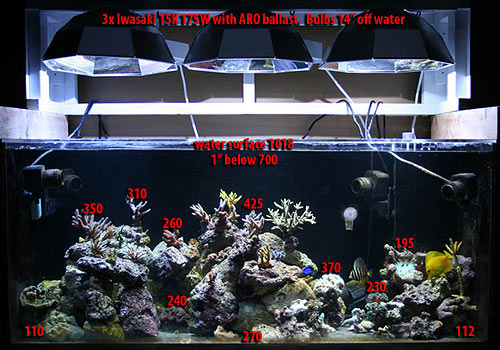 |
Over the past couple years I have listened and read many reef keepers posts as to what wattage bulb they should go with. What we had found over the course of the LumenBright thread is that it should be much easier to settle with 250w bulbs even with a SPS dominant tank. It is evident to me that under LumenBrights, many 250w bulbs can produce PAR values equivalent of 400w bulbs under old reflector designs. Not all 250w bulbs are alike, but certainly most 250w bulbs will do well enough under a LumenBright to grow SPS throughout our tanks. The amount of heat and radiation generated from a 175w or 250w bulb is considerably less than a 400w bulb. Due to this fact, they can be mounted lower than 400w bulbs generally recommended at a starting height of 14” for optimal spread under a LumenBright. As you can see, the numbers produced by these three 175w bulbs will be sufficient for many applications.
Acclimation:
I cannot stress enough the importance of properly acclimating your coral in any reef system. One of my early considerations I made when first mounting my LumenBright reflectors was how I was going to acclimate the coral to this new lighting system. I was fortunate enough to have a PAR meter available for me to see exactly what level of light each coral was getting in my reef system. This led me to bringing the PAR meter with me to local fish stores or fellow reef keepers’ houses to test exactly what the coral was getting in the store or in my friend’s tank. Most reef keepers blindly estimate not only what PAR the coral was receiving in the other guy’s tank but also in our own. It is like the blind leading the blind. By understanding what a coral had been receiving previously, we can better acclimate that coral to our own reef system. I see reef keepers paying hundreds of dollars on test equipment, but the idea of buying a PAR meter is the last thing these reef keepers are considering. It boggles my mind as we spend so much money on these tanks and we don’t know how much of a crucial food source our corals are receiving. OK, I am done with my rant. But please, if you have the means, buy a PAR meter, borrow a friend’s, or at least encourage your reef club to purchase one so it can be lent out. These meters can last you a long time if taken care of so that everyone else can benefit from them.
This whole concept inspired me to test one particular tank to compare the difference between a large LumenArc 3 reflector and a large LumenBright. At the time everyone was convinced that the difference was negligible and due to the supposable lack of spread of a LumenBright, the LumenArc 3 would be on top as you move further away from the bulb. It was evident to us that the LumenBright clearly outperformed the LumenArc in all distances from the bulb.
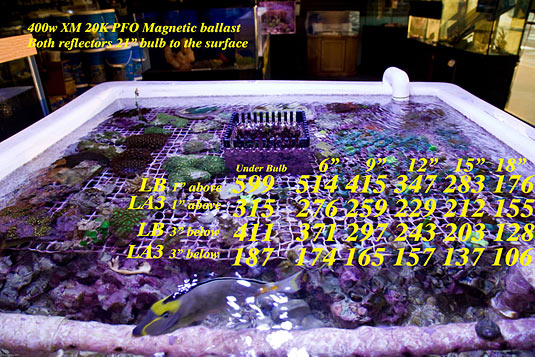 |
This clearly made me understand that with the use of LumenBrights comes an even greater need for proper acclimation, as these reflectors are just that much stronger. Seriously people, please be careful when switching to these reflectors. They are much stronger than people think. I can’t tell you how many shocked faces I have seen when I test there old reflectors and they see how low there PAR numbers are under other reflectors. To give an extreme example, if I was to take a light-loving Acropora sp. coral that had been receiving 150 PAR in the store, and I decide to place that coral at 500 PAR in my tank as its final resting place, what do you think will be the result? Sure that coral may typically thrive under 500 PAR, but the amount of stress this lighting adjustment will cause will most likely be the end for this coral.
So what are the best ways to acclimate your coral to your new intense LumenBrights? My first recommendation will be to start that coral off at a similar light level as what you found in its previous residence. This will assure that the coral is in a familiar place. My next recommendation would be more for when you are completely clueless to what this coral was getting or will be getting when you bring it home. I would still apply this suggestion to when you do know those PAR levels. Basically I would generally recommend reducing your light cycle down a few hours less than you previously set them. So if your metal halides were on for eight hours, then reduce the light cycle to five hours. This applies to the light provided by your intense metal halides. Supplemental lighting is typically not as important to reduce, as they are usually not as intense as metal halide bulbs. Over the course of weeks, yes I said weeks everyone, I would increase the amount of light by 30 minutes every week until you get back to your original light cycle. I would recommend this each and every time you bring a delicate coral into your system. A third possibility is to use a dimmable ballast to reduce the amount of light emitted and slowly ramp this up to your original level. A PAR meter again would be very helpful throughout this process to better understand how much you reduced the light to begin with and how much you raise it over time. Care should be taken with all of these techniques as you most likely have existing coral that may be affected by changes in the environment. Proper daily diagnoses of all coral in the tank should be done to assure the health of all the inhabitants in your reef system.
As it was discussed earlier, when you break below the surface of the water, the light levels drop dramatically. Here is another example of a situation in which acclimation to the LumenBright is crucial. You bring a PAR meter with you to a fellow reef keeper’s house. He/she decides to give you a prize frag from their collection that was receiving 200 PAR. You bring this frag home and want this coral to reside in a particular spot that is currently receiving 600 PAR. Knowing this you decide to leave that coral on the sand because you are measuring 200 PAR there and know that this is what it received at its previous residence. You reduce the light cycle slowly ramping it up to your original light cycle. Or maybe you decide to just turn down your dimmable ballast to reduce the light provided. Now you are faced with the challenge of raising that coral into higher light levels to bring it to that particular spot you set aside. You know now that if you put that coral in its final resting place right away that it will most likely stress the coral possibly stunting it or even bleaching it before it had a chance. So what are you to do?
This scenario will be very common as you acquire coral. This is why it would be so nice to have a PAR meter available to see what increase in PAR is made each time you raise this coral closer to its final chosen spot. With such an extreme example you would raise this coral slowly over several weeks to assure its survival. You hopefully plan to have this coral in your tank for many years, so a few weeks is not too much to ask of yourself to just do it right. Acclimate your coral properly and both you and the coral will certainly benefit from your diligence.
Many reef keepers might feel that I am a bit paranoid by acclimating in this way, feeling our corals can handle more rapid change. Maybe so, but my experience tells me that when I’ve been impatient, I have lost corals very quickly. It is important to note that light acclimation is just one part of this puzzle. Many would agree that sticking a coral right in the direct line of a powerhead would be equally stressful, especially if that coral sat in a calm area in its previous residence. It is important to encompass all of the coral’s needs when acclimating them to your system.
Conclusion:
Over the last nine months, we have learned much as we used these wonderful reflectors, discovering numerous benefits to us as reef keepers. They have sparked a lot of innovative conversation with regards to lighting our reef systems. Most importantly how raising our reflectors from the water’s surface reduces excessive heat, reduces water evaporation, prevents salt encrusted reflectors, protects from potentially harmful UV radiation, and provides more room to work within our canopies. It all stems from this thread on Reef Central that should be looked to for further investigation, questions, and information that has been gathered.
 |
 |
I hope you found this article to be informative and that it has sparked some thought as to how much light your corals are receiving in your tank. I encourage you to visit the thread to add your insights into this hobbyist’s perspective. I, as well as many other regulars to the thread, will certainly be around to answer questions and to help reef keepers properly use these LumenBrights in their systems.
“New Lumen Bright Reflector. ... any info on them”
With the purpose of keeping this initial article as short as possible, PAR testing and our findings will be in a future article of Reef keeping Magazine. A key portion of that article will discuss how testing PAR in stagnant water does not correlate to the amount of light that corals actually receive as compared to pumps creating flow through the reef.
I want to thank all of those that have participated in the investigation and implementation of these reflectors on the LumenBright thread and for providing photographs of their systems. Some notable reef keepers include Russ Toledo (Deuce67), Marc Levenson (melev), Jeremy Rykiel (JRaquatics), and Lee Kordel (Glxtrix). I also want to thank Justin Miedwig (fijiblue) for helping me with much of the PAR testing that I performed and especially the comparison test. And last I would like to thank Mike Leonard (acropora nut) of Reef Specialty for introducing me to LumenBrights as well as for collaboratively working with me on figuring out the proper implementation of these reflectors.
|