|
The following is a user’s review of the new Reeflo 250 skimmer using the Orca Needlewheel. This unit was purchased from Premium Aquatics (retail at time of purchase $1299.00) and is from the first production run of this model. I have no affiliation with either Premium Aquatics or Reeflo. The purpose of this review is to provide my impressions and opinions of this unit.
First Impressions
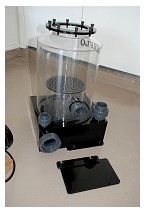
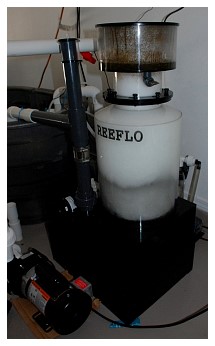
Wow! I was immediately impressed with the size of the unit; the main box is certainly quite large. The skimmer comes shipped in two boxes. The smaller box contains the pump and the other contains the actual skimmer and all of the pipes, tubes, etc. used on the body of the skimmer. It is clearly well-packed with a thick Styrofoam-molded insert. On the top of the box are the fittings and a large plate used to mount the pump. Removing the first tray reveals the skimmer itself. The body and the collection cup are wrapped in plastic and are in separate cut-out sections. First impression… I hope the skimmer works as well as it was packed.
Upon removing the pieces I was immediately impressed with the unit’s quality. It is pretty heavy and very well constructed. There were no noticeable scratches on the acrylic, nor were there glue spills, acrylic burrs or rough edges. The unit is very well-made and polished.
Assembly
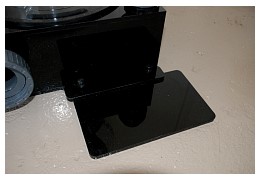
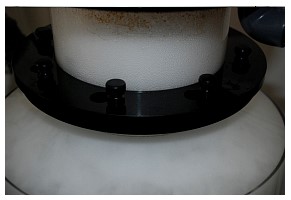
The skimmer’s box contains a single information sheet regarding its assembly. It’s not the most informative set of instructions I have read, but it is enough. All in all, the assembly took less than 30 minutes. The first step is to fit to the base of the skimmer box the small black acrylic plate that’s used to support the pump (Figures 1 and 2). The next step is assembling the pump.
|
Figure 1. |
Figure 2. |
Figure 3. |
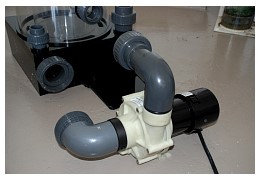
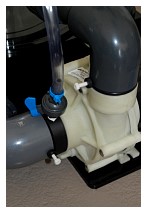
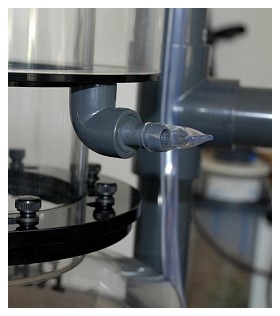
Upon opening the box for the pump you will find a grey plastic fitting. This is the venturi for the pump if you are just buying the pump alone; it is not needed for the skimmer. A feature I was surprised to see was that the two PVC elbows were pre-Teflon taped to fit into the Sequence Dart needlewheel pump. These simply screw in. The one issue I had to deal with was aligning the venturi to face upward, rather than at a slight angle downward (Figure 3), once the elbow was fitted onto the pump. This was easily rectified with a ¼ turn to slightly loosen it (Figure 4), but required the use of a little more Teflon tape to ensure a good seal. I recommend using the pink Teflon tape - if you can find it - because it is slightly thicker than the white tape and works well with sealing water-bearing fittings. The grey elbow and the black fitting that connects into the pump are separate, and can be twisted with a little effort to allow perfect alignment. This is a neat feature, and one I was not expecting.
|
Figure 4. |
Figure 5. |
Figure 6. |
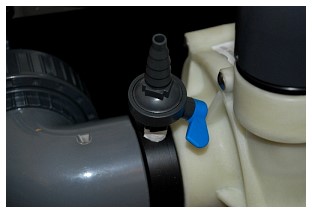
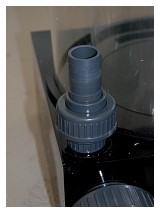
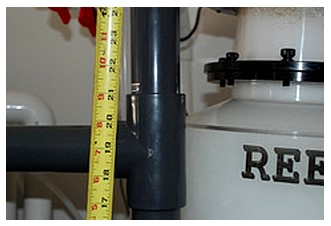
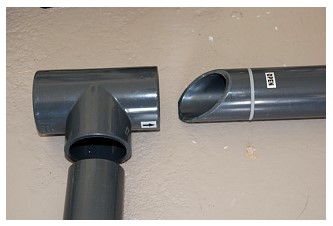
During assembly the inclusion of two small white plastic screws should be duly noted. These are used to lock the PVC elbow onto the threaded inserts that go into and out of the pump to prevent rotation during vibration of the pump. There are small holes in each PVC piece at that junction (see Figure 5), and the screws are fitted into these, tightened, and then locked down with the black plastic nut. The pump can then be fitted to the skimmer’s body. Ensure that the unions align, and then screw them tight and closed. To supply the skimmer with water, there is another union near the pump. The unit comes with two pipe nipples, one for 1 ¼” pipe and the other for 1” pipe. I used the 1 ¼” fitting (Figure 6), which I glued into place to the top part of the union, then pushed a length of 1 ¼” plastic pipe over the nipple and secured it in place with a pipe clamp. On my system I am gravity feeding the skimmer, and the other end of this pipe connects to one of the two overflows I have. Finally, the return to the tank needs to be fitted. Once you have determined where the skimmer will sit and where the overflow will feed it water, the return piping can be glued together. The first thing to check is the height of the assembled overflow. From the floor this is approximately 18” (Figure 7), so if your sump is taller than that a box will need to be built to raise the skimmer. For building purposes, the skimmer’s footprint is approximately 16” by 20”. On my system I had to build a box 8” high to raise the skimmer. The initial step in assembling the overflow is gluing the shorter grey pipe into the union. When fitted, this should sit below the joint between the skimmer’s body and the slope of the barrel (Figure 7). Next, glue the “T” in place pointing toward the sump, with the arrow facing upward and, finally, the longer piece can be glued in horizontally to create the return line to the sump (Figure 8). Note: at this point there are two options depending on the fittings you will use. If you are using a 1 ¼” PVC fitting, then the grey pipe that is milled at one end will need to be used. This is provided so that it fits into U.S. fittings. I added a straight connector here to extend the return to my sump. Into the top of the “T” fits a pipe that is cut at 45 degrees. This should be initially fitted such that the arrow on the “T” points to the OPEN mark on the pipe. The pipe should be pushed in firmly to make a snug fit. Rotating this pipe allows the user to control the flow through the skimmer and adjust the water’s height in the riser (Figure 8).
 |
 |
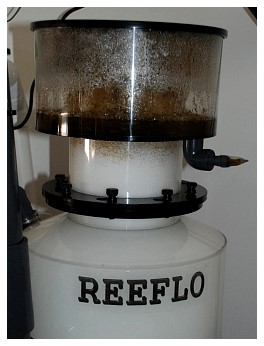
The next step is the assembly of the air feed. The blue levered valve is screwed into the hole located in the elbow next to the pump. I found this to be a tight fit when rotating the valve due to the size of the pump's body. If you open the valve (so that the lever is flat) it screws in easily (see Figure 4 above). Once it's fitted, connect the opaque silicon tube to the valve, and fit the black cup-like fitting (the silencer) to the other end. Slide this over the top of the return pipe's siphon break and fit the black cap. A design feature that some have questioned is the ring of plastic nuts holding the collection cup to the skimmer’s body (Figure 9).
 |
While I had my doubts about the ease of use, I did a quick test and it takes possibly 20-30 seconds to slacken them off and remove the cup; tightening the screws back down takes even less. All in all, I don’t see this as a problem. Between the skimmer’s barrel and the cup sits a red rubber “O” ring used to form the seal. The final step is to slip the sealed piece of tubing over the overflow pipe in the collection cup (Figure 9). The skimmer is done. Time elapsed, approximately 30 minutes.
By comparison with other skimmers I have used and set up the construction is equal to or better than that of a Euroreef. There are no uniseals with a potential to leak (unlike the ASM G6 which was replaced by this skimmer). Total assembly time was a little more than a Euroreef/Deltec or the ASM due to the fitting and rotation of the pump unions, although the process was reasonably simple and stress free. Anyone who has tried to force a 1" inch pipe through a uniseal on an ASM skimmer will know how tight a fit that is and how careful you have to be. The same can be said of the larger Euroreefs, but the acrylic is much thicker in these and takes the pressure more readily.
Initial Use
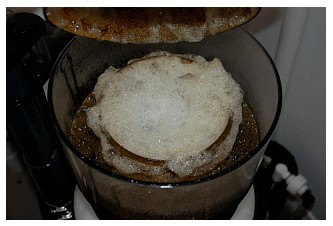
After assembly and a quick check that all fittings were tight, the overflow valve from the tank was opened and the skimmer began to fill. Once water was visible in the skimmer’s barrel, I stopped the flow and performed a leak check. Finding that all was well, I re-opened the valve and allowed the skimmer to fill and overflow into the sump. I then turned on the needlewheel pump. My first impression was that the unit was almost silent. Within seconds the barrel was filled with tiny bubbles, so much so that it resembled milk (Figures 10 and 11).
 |
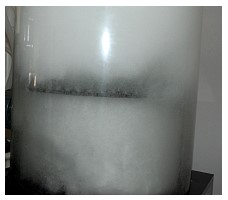 |
Once it had been running for a minute I closed the venturi valve and adjusted the water flow into the base of the neck, such that the water's surface was just under the black collection cup's flange, by adjusting the outflow at the open/closed fitting in the return. I then re-opened the venturi. For the first 10 minutes there were quite a few large bubbles popping in the neck, but after 20-30 minutes there was a clear line of darker-colored foam. After one hour there was a stable head of foam (Figures 12 and 13). At the six-hour mark the foam was thick and solid, enough so that it didn’t collapse if scooped out of the neck.
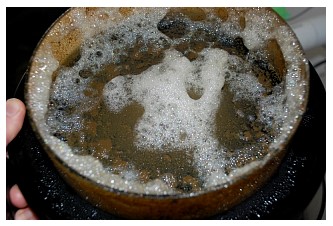
After 24 hours therewas an inch of very dark, foul smelling skimmate in the collection cup and an accumulation of gunk around the top of the neck (Figures 14 and 15).
Extended Use
The skimmer has now been in use for two months. Since its installation I have yet to discover any problems with its performance. Apart from cleaning the cup frequently, I have had no issues with it at all. While reading various threads on Reef Central it would appear that some (not all) users have had some issues with a potential to overflow. This seems to result from power outages (be they intentional due to turning the power off or from a power failure). In this scenario the pump forces an excess amount of air into the skimmer as the barrel refills, and this results in excess volume and a spill. Since my setup is gravity fed via the main tank, it has not been an issue for me. In a power outage the tank slowly drains to the level of the overflow, and the flow into the skimmer stops. As power returns the skimmer slowly fills as water returns to the main system and thus equilibrium is achieved more slowly. If the skimmer is being directly fed from a sump, this issue can be solved by directly connecting the drain in the cup to a large bucket.
Possible Improvements
Certainly, the assembly instructions could be better done. I also would have liked to see a drain valve incorporated into the skimmer’s base box. I discovered this when I had to drain the skimmer to move it to its final resting place, and it was a pain siphoning the contents through the neck. Having said that, though, neither my older Deltec nor the ASM G6 skimmer had a way to drain the body without removing a pump. An alternate suggestion would be draining the contents via the silicone venturi tubing, but this leaves a substantial amount of water in the skimmer’s base. The neck screws may prove to be an issue for some, but I have no real issue with them.
Marks Out of 10
All the way up there, I would say 9.5. Overall, this is a very nicely made, extremely efficient and quiet unit; and is one that I am extremely pleased with.
|