|
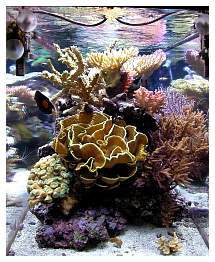
Jose Dieck's (jdieck) Reef Aquarium
Some Background or…
How to Start Something You Really Know Nothing About
Five years ago when
I saw a reef aquarium for the first time I never imagined
that one day I would be sharing the experience of my own tank
with all of you. At that time, I was based in Singapore, where
people are very good at putting together beautiful systems.
I was bombarded with beautiful tanks at shopping centers,
airports, offices, you name it, and every time I saw one I
wanted to have my own. Little did I know the level of involvement,
learning and all kinds of new skills required to do the job.
Upon returning to the United States and while looking for
a new home, I had already decided that the house had to (yes,
HAD to!) include a reef aquarium. Having found a new house
that still required some work before its completion, I took
the opportunity to do some advance preparation, but not without
first passing the hurdle of "consulting" with my
dear significant other (please don't ask for particulars).
We selected the location, had the floor reinforced and ran
some extra electrical circuits for the job. By then, the engineer
within me had started to take over so I had to have a clear
understanding of what was to be involved, what the equipment
would look like, its final arrangement, size, amount of flow…
so many options! There were so many decisions to be made,
and I had not even started yet.
My first step was to determine a general outline and work
from there. I started educating myself, reading as much as
possible, getting books, looking at websites such as Reef
Central (which became my favorite consulting source), learning
about other systems, visiting others' tanks from which I could
get ideas and, of course, asking a lot of questions.
I decided that the aquarium had to meet these initial requirements:
a) It would be a bay unit that would stand as a divider
between the family room and the breakfast area.
b) I would prefer as large a tank as possible within the
allotted area, for maximum stability.
c) All peripherals would be located out of sight in the
basement equipment room.
d) The stand's and canopy's finish would have to match the
rest of the house's furniture and cabinetry.
After preparing some designs and drawings, I took them to
the same carpenters who had built our kitchen cabinets. They
were very good and diligent, and I really liked the job they
were doing (well, at least until close to the end when I saw
their bill). Finally, this is the collection of goodies I
came up with for the system that has been up and running for
slightly over two and a half years.
The System:
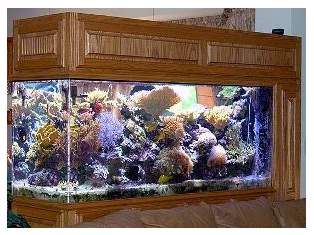
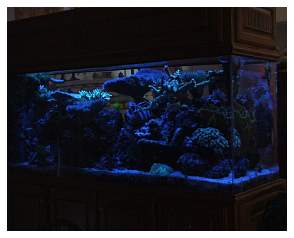
Main Display Tank:
|
|
Tank:
acrylic, 225 gallons, 72" long x 30"
deep x 24" wide |
|
|
Stand
& Canopy: Solid Oak, Maple and marine
plywood |
|
|
Lighting:
72" long aluminum hood with three 400-watt
metal halide AB 14K bulbs and four 96-watt
power compact actinic bulbs on electronic
ballasts |
|
|
Moonlights:
four 7.5-watt incandescent blue bulbs |
|
|
Nightlights:
four blue HID bulbs |
|
|
Circulation:
dual ¾" returns, dual 1½"
drains with an internal overflow box |
|
|
Light hood.
Refugium:
55-gallon glass tank on a DIY stand with a total of 285
watts of lighting: 10K metal halide and power compact lighting.
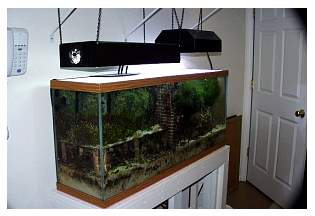
Propagation Tank:
70-gallon acrylic tank, 48" long by 24" wide
by 14" deep with two 250-watt metal halide14K bulbs
and two T5 actinic bulbs powered by electronic ballasts.
Left: fragment grow-out tank. Right: refugium.
Quarantine Tank:
29-gallon glass aquarium with one 250-watt metal halide
10K bulb, a CPR Back Pak skimmer, a canister filter and
a 9-watt UV sterilizer.
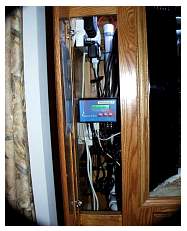
System Peripherals:
-
1200 gph ETS downdraft skimmer with auto waste collector
-
Three chamber calcium reactor with 30 lb. media capacity
-
Nilsen reactor with dosing pump
-
200 mg/hr ozone generator
-
40-watt UV sterilizer
-
1/3 HP inline chiller
-
Two 350-watt titanium heaters
-
160 gpd pumped RO/DI dual membrane unit with liquid level
controller, pass to drain valve, auto flush valve and
purity & rejection monitors
-
34-gallon RO/DI storage tank
-
55-gallon mixing tank with 900 gph recirculation and
transfer pump, 4cfm air pump and two 350-watt titanium
heaters
-
40-gallon sump
-
Three channel trace element dosing pump
-
1600 gph main recirculation pump
-
1250 gph skimmer pump
-
Several powerheads for internal circulation
-
X-10 based controller
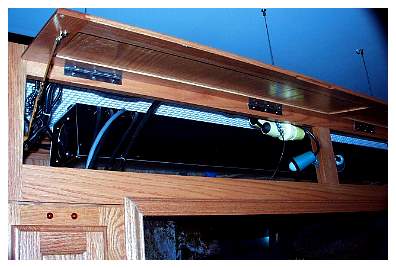
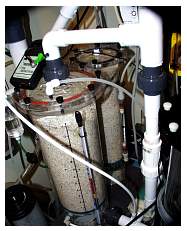
Top left: General view of the basement equipment room.
Top center: Aquacontroller located under the tank.
Top right: calcium reactor. Bottom left: RO/DI
filter. Bottom center: ETS skimmer. Bottom right:
UV sterilizer.
Soon after receiving the equipment I realized that the allotted
space was going to make it a really tight fit. I measured
all of the equipment's footprints, cut some pieces of paper
to scale and started trying to move things around to test
fit them. After trying several permutations, a couple of things
became obvious. First, the equipment would not fit unless
shelves were used. Second, a 40-gallon sump would be too small
to meet the system's requirements. It would be difficult for
the skimmer to do a proper job if it were on a shelf, so I
decided to use an additional 37-gallon pre-sump with an overflow
to feed the skimmer.
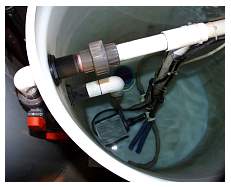
Left: Geo kalkreactor. Center: saltwater mixing
container. Right: ozone generator.
After getting the equipment arrangement out of the way, I
started preparing the site. I began boarding the walls and
waterproofing the surfaces using primer and an oil-based alkyd
paint. Additionally, I built a wood box on the floor which
I covered with fiberglass and connected it to a drain that
would act as a receptor for any potential leaks from the sumps
or equipment on the shelves. Inside the box I installed the
shelves and padded pump mounts that were also sealed and painted.
Then it was time for the next step.
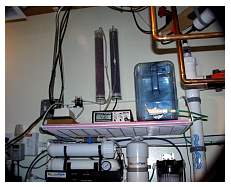
Left: Doser and pH controller. Right: Drain
and return lines and ballasts located under the tank.
Becoming an Electrician or…
How Shocking Life Can Be
Having been shocked before and trying
to work safely, I turned off the power before starting the
electrical work. A useful tip…hmm… Before turning
the power off, be sure that your spouse or friend is not running
on the treadmill. Ouch! Well, things happen…
Having defined the location and electrical loads of all the
equipment, I proceeded to mark the locations for the plugs,
GFCIs and power switches required to take the equipment out
of service for cleaning and maintenance. Also, with the local
electrical code in hand, I selected the wire gauge to use.
I was really surprised at the number of boxes, switches, power
strips and the total amount of power required, so I decided
to run a second circuit and split the load between the two.
This new dual circuit design required an X-10 signal bridge
and amplifier, which also gave me the idea of installing an
emergency shut-off system. Additionally, since it allowed
me the option of using 220 volts for the heavier loads, I
decided to install both 220 and 110 volts for the main lighting
as well as for the main return pump. For purposes of easy
installation, maintenance and possible expansion sometime
in the future, I decided to use surface mounted boxes and
conduits. After a couple of weeks and multiple trips to my
favorite hardware supplier, who started calling me by name,
the electrical system had been completed and tested. By then
I was basically living in the basement, so it was time for
a break to mend spousal relationships.
 |
Hydraulic Engineering, How to be a Plumber or…
"Mom! Dad has Been Drinking…"
Well, with the equipment in its place,
the lengths of piping, hoses and tubing needed were well-defined,
but how did you say you glue this thing together? After some
bloopers, trials and errors the piping began taking shape,
one piece and fitting at a time. Some modifications had to
be made on the fly and some more valves were added to ensure
that each piece of equipment would be removable even while
the system was running.
The finished stand arrived and the tank was put into place.
That day I think I looked like a dog with a fresh bone. Well,
more like a kid in a candy store. Of course, by then the hardware
store manager walked up to me to say hello every time I went
into his store. I was also making a lot of friends with online
vendors. Oh, yes, another tip- If you're planning to glue
a lot of fittings and pipes, be sure to vent the area well
so you do not end up with a speech impediment, red eyes and
your kids telling funny stories about you!
Niagara Falls in the basement - the good, the bad and the
ugliest…
Testing time. The tank was filled, the lines purged and the
button was pushed. No leaks here, no leaks there and everything
seemed fine… so far. After running for several minutes,
the water leak alarm went off! I ran to the basement and found
a surge of water spraying everywhere! Did I mention a drip
box connected to the drain? I never thought it would serve
its purpose so soon. Well, I had the opportunity to test the
electrical system's and walls' waterproofing, to say the least.
After the system shut off, I discovered that I had overtightened
the fittings onto the chiller's PVC adapters and they had
burst open. After replacing the fittings, I refilled the lost
water and ran the system for a couple of days.
I started taking notes of all the bugs that needed repair
or modification. I fixed the noisy drainpipes and cooling
fans, and replaced the main pump with a smaller one because
the original pump pushed 3500 gph, which the overflow could
not handle. I installed overflows in the pre-sump, installed
X-10 noise filters in the PC lighting plugs to solve electrical
interference problems, and replaced a couple of defective
GFCIs that kept tripping under a normal load. I installed
support bars to the canopy doors (which fell on my head a
couple of times), forced ventilation in the equipment room
to get rid of the excessive moisture, an outside air inlet
for the skimmer, replaced the heavy wooden canopy covers with
eggcrate, installed a check valve in the main return lines
and drilled anti-siphon holes, two spray bars (which I removed
six months later for added circulation) and tested various
controller software. Oh, I almost forgot; I was getting a
bit tired of TV dinners and sleeping with the rabbits (our
other pets), so I went back to some more quality family time
again.
Marine Biology or…
The Equipment Does not Make the Aquarist!
After a couple of
weeks of smooth operation, it was time for the fun part: stocking
the system. And I thought the installation had been difficult!
I ordered 300 pounds of a combination of dry and live aragonite
sand and drove my truck to the reef farm, from which I was
lucky to be only an hour's drive away. I was allowed to hand-pick
330 pounds of cured live rock. I got a combination of Fiji
rock, Tonga plate (great for caves) and Tonga branch rock.
I used about 45 PVC couplings with drilled sides as stands
for the rock. I wished the tank was wider than 24"; it
was not easy to accommodate that much rock and still leave
space for optimal two-sided viewing.
After the rock was in place, I half-filled the tank with
salt water and proceeded to pour the wet sand onto the bottom
using a powerhead to blow it under the rock and to cover the
PVC couplings acting as support poles to raise the rock off
the bottom.
Against all recommendations I had washed the dry sand, so
I initially got very little turbidity. After running for 12
hours and emptying the skimmer a couple of times, the water
was crystal clear. Thanks to the cured rock and how fast it
was transferred into the new system, and with the additional
help from the bacteria in the live sand, the ammonia never
spiked. In any case, I let the system run for a month with
only a minimal clean-up crew.
By now I was well into the "Help! I need an ID"
game:
What is that critter looking at me from that little hole?
What? A what? There he goes out…
Oh my God! A worm! He stays…
Foraminiferwhat? Yes, those little red sharp thingies.
What does "Aptanasia" have to do with this? She
might have been the discoverer, so those things might have
been named after her.
What? Kalk?
Now what? Brown algae? Red algae? Green algae? "Tutti
Fruiti" algae?
What did you say they were? "Flathelminthes?" A
hairy thing? (Certainly, not my head).
How do you pronounce "Refugio?"
So many names to learn and remember; this was a totally new
language for me to fathom.
There were many sleepless nights spent dreaming of pests and
crawling, clawy monsters. So much more to learn and so fast.
Well, it shall be easy to do if you have the Doctor's forum
and an elephant's memory.
Parameters or…
Blessed be the Chemistry Forum
Water
Parameters:
|
|
Temperature:
78.5 to 79.5°F |
|
|
Specific
Gravity: 1.025 |
|
|
pH:
8.05 to 8.1 |
|
|
Calcium:
~ 400 to 425 ppm |
|
|
Alkalinity:
~10 to 10.5 dKH |
|
|
Magnesium:
~1200 to 1250 ppm |
|
|
ORP:
350 to 390 |
|
|
Ammonia,
nitrite, nitrate, phosphate and silicate:
none detectable |
|
|
|
Time for learning one more skill:
the calcium / alkalinity / pH balancing act. Back to the reading
and the books, more questions and system adjustments before
the tank finally achieves some stability.
Supplements:
-
Calcium reactor saturated effluent at 140 ml/hr
-
Limewater addition at night with only 2.5 gallons of
evaporation per day
-
1.5 ml/day of strontium/molybdenum
-
Ozone: 50 mg/hr continuously injected into the skimmer's
inlet
-
Activated carbon, organic removal resin and phosphate
remover run continuously
Other Operation Parameters:
-
Photoperiod for the actinics is 14 hours/day and the
metal halides run for 12 hours/day
-
The propagation tank and refugium are on a reverse daylight
cycle. Chaetomorpha is used for additional nutrient export.
-
The ultraviolet sterilizer runs continuously.
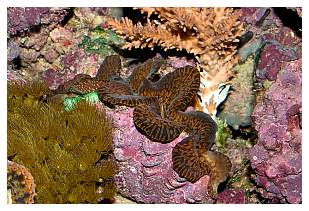
Critters in my Living Room or…
Meet my Silent Friends
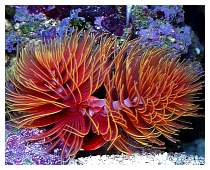
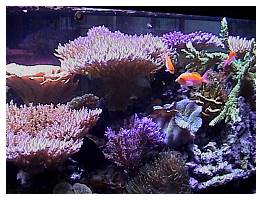
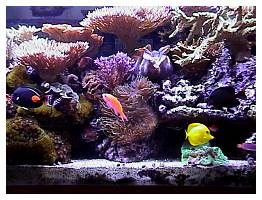
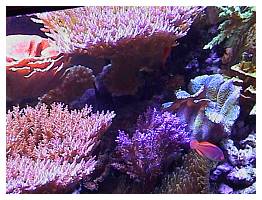
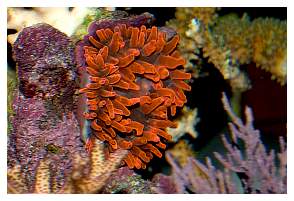
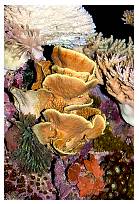
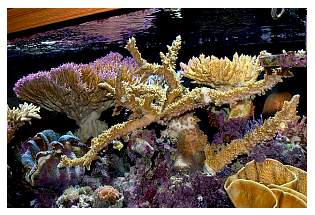
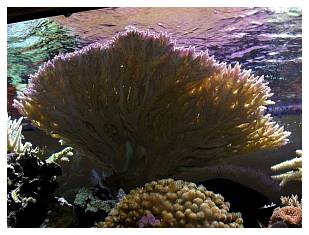
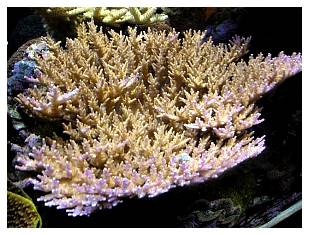
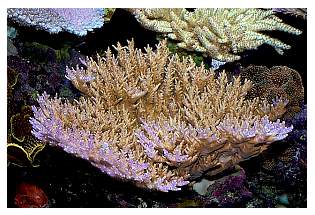
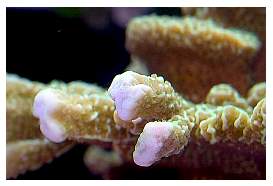
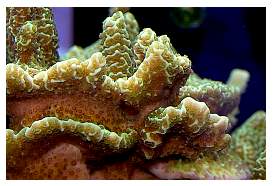
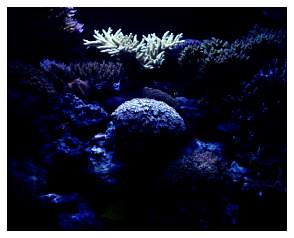
Corals:
I would say that, although I did
a lot of planning of the equipment and its installation, I
was a bit lacking in planning the species I wanted to keep.
As commonly seen, I tried to start with easy to keep soft
corals, which over time have been replaced by a bit more challenging
large polyp and small polyp scleractinians, eventually ending
up with what could be defined as a mixed tank.
As of today most of the soft corals are gone with the exception
of some beautiful Red Sea Xenia and those dreaded zooanthids
that spread so rapidly that I have a hard time keeping them
in check.
Another thing I probably should not have done was to load
the tank with lots of fragments and colonies. I have some
kind of personal aversion to chopping (sorry, fragging) corals
to keep them small, so as they grew some corals had to be
taken out to allow others to continue growing. Now, I have
few options regarding fragmentation. Many colonies have matured
nicely but have grown to a point where I can no longer take
them out through the aquarium's openings without breaking
them. An additional issue is that some have reached the water's
surface or the aquarium's walls. Frags anyone? Soon…
pretty soon…
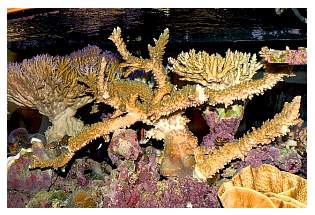
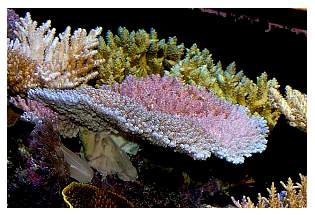
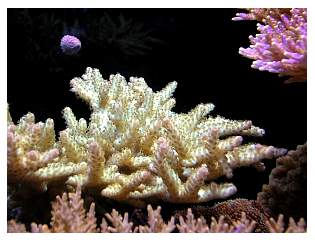
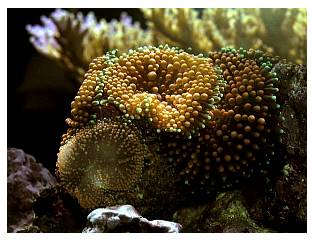
Here is a not all-inclusive list of the corals:
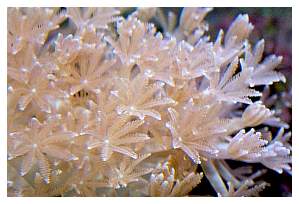
- Soft Corals:
Several species of zoanthids, Yellow polyps and Palythoa
sp.
Red Sea white Xenia sp.
Green star polyps
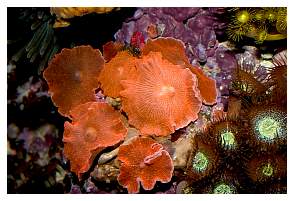
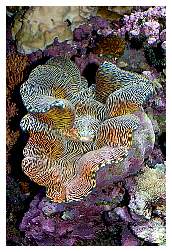
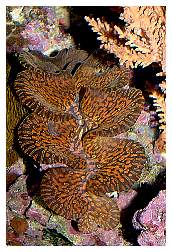
- LPS and other non-SPS:
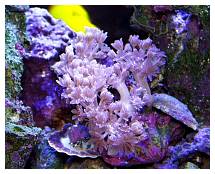
Green Euphyllia (Frogspawn)
White Alveopora sp.
White/green Clavularia (Pipe Organ)
Heliopora coerulea
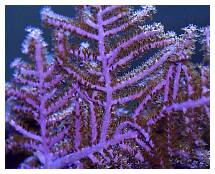
Purple Frilly Gorgonians
Green Trumpet coral (Candy Cane)
Neon green Open Brain coral
5 different color colonies of Ricordea sp.
Green Pectinia sp.
Acropora nana
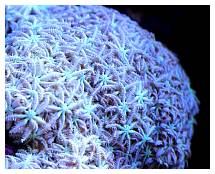
- SPS:
Acropora nana
Green/red-tipped Acropora sarmentosa
Orange Acropora sarmentosa
Green Pocillopora sp.
Pink Stylophora sp.
Yellow Turbinaria (Scroll coral)
Elkhorn Montipora sp.
Green staghorn Acropora sp.
Pink and blue table Acropora sp.
Purple bottle brush Acropora sp.
Green Montipora confusa
Some more species of pink, yellow and purple-tipped
Acropora sp.
Fish:
I have had many of my favorite fish since the start up of
the aquarium. Unfortunately, some were lost for unknown reasons
and a couple were lost due to my inexperience. Yes, some carpet
surfing occurred despite the covers; those blue-spotted jawfish
seem to be skilled at finding even the smallest holes.
Here is the list:
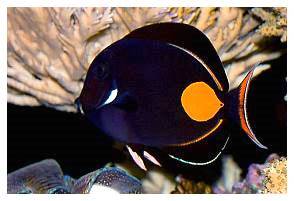
-
Achilles Tang
-
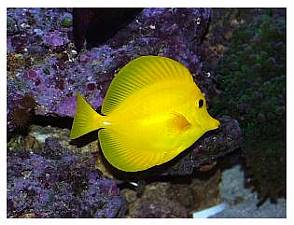
Yellow Tang
-
Chevron Tang
-
A mated pair of False Percula clownfish (the little guys
spawn almost once a month)
-
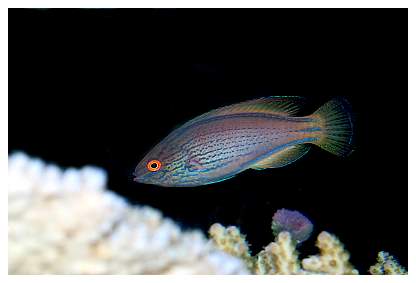
A pair of Lineatus wrasses
-
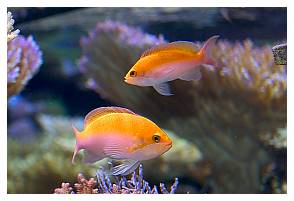
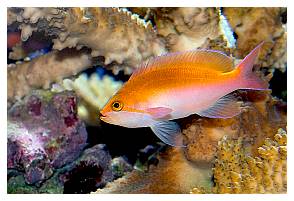
Male and female sunburst Anthias
The fish all behave pretty much like good citizens, keeping
to their own space, and they have learned to respect each
other's space. Once in a while the Achilles tang, which I
call Attila given its character, will flash either the Chevron
or the Yellow tang when it gets too close for comfort but
usually just parts away to continue with his grazing. The
Chevron tang, which was once a very attractive orange with
purple reticulate, has grown to be a very dark brown with
dark olive-colored stripes. Although not as spectacular as
he was when small, he is such a good grazer who keeps the
aquarium completely algae free, and I am thankful to have
him.
 |
 |
It is very entertaining to see the clowns being playful with
each other. The attachment they have developed is really amazing.
Once, one of them swam too far away and became lost in the
tank. I have no words to describe its desperation and anguish
while frantically looking around to return to its spot and
mate. After about half an hour, it found its way back. Both
spent about an hour swimming around each other (which I can
best describe as happily dancing) while gently touching. I
almost felt like they were smiling at one another (well…
almost). The Anthias are particularly fast swimmers and are
always sharply attentive to their surroundings. The wrasses
are constantly intent on carefully observing the rockwork
and corals for little critters for dinner. It's really a wonderful
sight to behold.
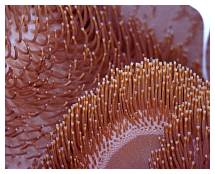
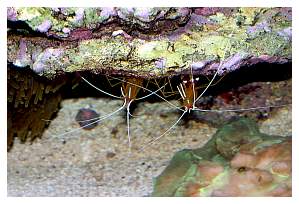
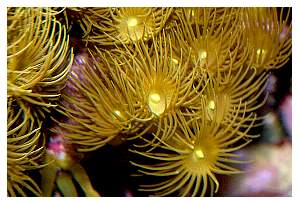
The Other Critters:
Besides the typical snail and hermit parade, I have the following:
 |
-
Two Tridacna maxima clams, one black and the other
a brown / gold teardrop
-
A gold striped purple-rimmed Tridacna derasa.
What a way to grow!!! A bit of advice: I would not recommend
testing the responsiveness of your clam by touching the
mantle with your index finger, especially if it is a large
clam because an unpredictable chain of events may develop...
Yep! It closed suddenly and my finger was trapped for
two minutes while my wife observed nearby laughing. Ouch!!!!
Cut deep to the bone.
-
Two green bubble-tip anemones. The original one split
several times to produce about five clones that I was
able to take to my friendly LFS.
-
One bubble-tip Rose anemone
-
A mated pair of cleaner shrimp
-
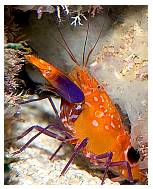
A nice purple-spotted pistol shrimp (photo right)
-
Some sand-sifting starfish and a nice burgundy Linckia,
which is growing nicely.
-
Finally, what I think I can now call my friend…
the un-catchable green smasher Mantis shrimp. Yes, a Mantis
has been living in my tank for about a year now, becoming
the snail population's nemesis. I was once able to catch
him when he was little, so I placed him into the quarantine
tank with some live rock. After some time doing a bit
of re-arranging on the main display, I needed some rock,
which I took from the quarantine tank. Once finished with
my work, I stepped back to observe my masterwork and there
he was, peeking at me out of a hole. I could swear he
was laughing and singing something like, "Nana…
nana… naa!" He has learned all the tricks by
now.
The rest of the bestiary includes a couple of beautiful three
foot long blue and white bristle worms (beauty is in the eyes
of the beholder) and countless numbers of various worms, as
well as mini stars, pods, mini feather dusters and sponges.
Maintenance Schedule or…
"Honey, Can we Go Out?"
Have you ever really thought about
all the things we do to keep things running? When I made this
list, I could hardly believe it.
Daily:
-
Feeding: I usually feed once a day, late in the evening
when the actinics are still on. I feed a couple of pinches
of flake formula and half a Nori on a clip. Once in a
while, I drop a pinch or so of granules into the refugium
and add some vitamins and garlic to the Nori. No special
feeding is supplied to the corals or anemones.
-
Check temperature, pH and ORP, observe the corals, fragments,
fish and visible critters for signs of sickness, damage
and such.
-
Quick check of the equipment: check the pumps for any
change in noise or vibration, the sump's water level,
the calcium and phosphate reactor's operation, and empty
the skimmer's waste collector, if necessary.
-
Check the wireless connection, controller's operation
and proper uploading of data.
-
And, of course, check the forums and threads once in
a while.
Weekly:
-
Wipe clean the aquarium's and propagation tank's viewing
panes
-
Siphon detritus from propagation tank
-
Perform a water change of approximately 55 gallons
-
Test the salinity, alkalinity and calcium levels
-
Wash the skimmer's top collection cup
-
Regenerate the silica dryer for the ozone generator
-
Wipe the UV sterilizer's quartz sleeve
-
If required, clean the fragment plugs
-
Clean the aquarium's covers and hood's reflectors
-
Inspect the drain's strainers for debris. Unplug the
Durso pipe's vent holes, if necessary
Monthly:
-
Test for phosphates, nitrate, nitrite, ammonia, magnesium
and silicates
-
Calibrate and test the pH and ORP probes
-
Replace carbon
-
Replace and regenerate resin
-
If necessary, replace phosphate-removing media
-
If necessary, top-off calcium reactor media and add lime
to the Nilsen reactor
-
Remove coralline from the aquarium's viewing panes
-
If required, get rid of some Aiptasia.
-
Test for proper operation of the GFCIs
-
If required, replace the RO/DI cartridges or membrane
-
Clean overflow teeth of coralline and remove polyp overgrowth
Quarterly:
-
Install mechanical filter and blow off detritus from
rock and corals
-
Siphon clean the top half of the main tank's sand bed
(Yes, I should know better)
-
Disassemble and clean powerheads. Replace the powerheads'
suction cups
-
Inspect and remove salt creep from the skimmer's air
intake
Every Six Months:
-
Empty and clean the sump and pre-sump
-
Clean the chiller's evaporator
-
Wash externally all equipment and piping
-
Clean the RO/DI and mixing storage tanks
-
Wipe / polish the acrylic panes
-
Replace the controller's back-up battery
-
Disassemble and clean the hood's cooling fans and the
ballast box vents
-
Clean and apply a protective wax to the stand's and canopy's
wood
Yearly:
-
Replace probes
- Replace bulbs
-
Replace UV lamp, wipers and seals
-
Inspect and clean centrifugal pumps
-
Dissemble and internally clean the chiller, check its
refrigerant and recharge, if necessary.
-
Inspect heater's and powerheads' wiring for damage and
cracks; replace if necessary.
-
Replace powerhead impellers
-
Disassemble and internally clean the whole skimmer, replace
the bioballs inside the foaming column
The Hard Times or…
Who Can we Count on for Support?
As with everything that's worth something,
there have to be good times and hard times. It is always heartbreaking
to see one of the fishes you have become so attached to, become
sick or die. To see your system invaded with cyanobacteria,
hair algae or see the cycles of Ich on your fish can be really
discouraging. Despite how hard you clean, change things or
parameters, or apply every suggestion you can find, the problems
seem to hang around forever until you reach the point of wanting
to quit the hobby.
If there is something this hobby has taught me, though,
it is to be patiently systematic. Eventually, I have been
able to resolve problematic issues thanks to the support,
teachings and assistance of the whole aquarium community.
I have been a member of various clubs with other hobbies whose
so-called experts acted more like "prima donnas"
looking for reverence.
I can only be grateful to the people who make Reef Central's
level of support possible. I mean experts who act like real
aquarists and dedicate their little free time to help and
research for fellow aquarists (yes, moderators included),
and who have helped me with their comments and suggestions,
and the many excellent and honest vendors and store owners
I have come across in this hobby also, without forgetting
the patience of my wife and kids. Additionally, many thanks
to Erik Carrillo and Bill Chamberlain for their wonderful
photos of my tank and livestock.
In summary, I have only one more thing to say… Thank
you, everyone! Thanks for making this more than just another
hobby.
Photos courtesy of Jose Dieck, Erik Carrillo
and Bill Chamberlain.
Feel free to comment or
ask questions about my tank in the Tank of the Month thread
on Reef Central.
|
If you'd like
to nominate a tank for Tank of the Month, click here
or use the button to the right.
|
 |
|